Tuesday, August 30, 2011

remove duplicate values from NSMutableArray in Objective-C

NSArray *copy = [YourMutableArray copy];
 
NSInteger index = [copy count] - 1;
 
for (id object in [copy reverseObjectEnumerator]) {
 
    if ([YourMutableArray
         indexOfObject:object inRange:NSMakeRange(0, index)] 
         != NSNotFound) 
 {
        [YourMutableArray removeObjectAtIndex:index];
 
    }
 
    index--;
}
[copy release];

Monday, August 29, 2011

stretch image in UIWebView

NSString *imageName = [[NSBundle mainBundle]
                        pathForResource:@"YourImageName" 
                        ofType:@"png"];
 
NSURL *imageURL = [NSURL fileURLWithPath: imageName];
 
NSURLRequest *imageRequest =[NSURLRequest requestWithURL:imageURL];
 
	// Load image in UIWebView 
 
imageWebView.scalesPageToFit = YES;
 
 
[imageWebView loadRequest: imageRequest];

Submitting iPhone Apps To The Apple App Store

Here’s a quick step by step guideline that you can print and keep hand, to use when your app is ready for submission. I am assuming that the reader of this article has an iPhone Developer License.

====== Step 1 ======

Certificate is an essential element to submit or test an application on iphone. It comes with code sign(Signatures) which would verified when an application is submitted on apple store or when tested on iphone.

One can bypass these if an application is installed on jail-break iphone or  when submitted on Cydia but this is not possible when one wants submit it to Appstore.


One has to through 2 step procedure to create a certificate from developer portal. I simply copied those two from “iphone developer portal”

[1] Generating Certificate Signing Request

[2] Submitting a Certificate Signing Request for Approval

Generating a Certificate Signing Request:
[3] Open the Utilities folder and launch Keychain Access from the Applications folder.

[4] Set the value of Online Certificate Status Protocol (OCSP) and Certificate Revocation List (CRL)
to “off” in the Preferences Menu.

[5] Select Keychain Access -> Certificate Assistant -> Request a Certificate from a Certificate Authority.

[6] Fill in your email address in User Email Address Field. Confirm that this email address is same as provided at the time of registering as iPhone developer.

[7] Fill in your name in the Common Name field. Confirm that this name is same as provided at the time of registering as iPhone developer.

[8] It is not necessary to have an Certificate Authority (CA). The ‘Required’ message would be eliminated after finishing the following step.

[9] Click the ‘save to disk’ radio button if prompted, choose ‘Let me specify key pair information’ and proceed.

[10] If  you choose ‘Let me specify key pair’ option then one has provide a file name and click ‘Save’. Select ‘2048 bits’ for Key Size and ‘RSA’ for the algorithm in next screen and proceed.

[11] CSR file would created on the desktop by Certificate Authority.


Submitting a Certificate Signing Request for Approval:
[1] Once CSR file is created log in to the iPhone developer program portal and go to ‘Certificates’> ‘Development’ and select ‘Add Certificate’.

[2] Click the ‘Choose file’ button, select your CSR and click ‘Submit’. The portal will reject the CSR if Key Size is not set to 2048 bit at the time of CSR creation.

[3] This will followed by notification to Team Admins by email of the certificate request.

[4] The change in the certificate status would informed by email on approval or rejection of the CSR by Team Admin.


Download/Installing Certificate on your machine
[5] Once the CSR is approved the Team Members and Team Admins can download their certificates via the ‘Certification’ section of the Program Portal.  Choose ‘Download’ next to the certificate name to download your iPhone development certificate to your local machine.

[6] Once this is done double-click the .cer file to launch Keychain Access and install your certificate.
On installation of certificate on your MAC the next step is to create an App ID.

Note: You have to follow this step only once and late you don’t have to make certificates for your other applications.


====== Step 2 ======


Follow the following steps to create an App ID:
[1] Go to ‘App IDs’ and click ‘App ID’ after logging in to iPhone developer program portal.

[2] Populate the ‘App Id Name’ field with your application name (that is – iPhone app) and in ‘App Id’

enter something like com.yourdomain.applicationname (i.e com.vijay.iphoneapp) and click submit.

[3] Please do note down the “App Id” as this would be utilized in Info.plist, bundle identifier tag.


====== Step 3 ======


Next step would be to create a Provisioning file for our Xcode and is the last step for creating binary which would submit it to Appstore.

[1] After you navigate to ‘Provisioning’> ‘Distribution’ click ‘Add Profile’ in iphone developer program portal.
 
[2] Choose “App Store” in “Distribution Method”.

[3] In “Profile Name” enter your application name (i.e iphoneapp) which will be your provisioning profile name as well.

[4] In “App ID” select the app name(i.e. iphoneapp) which you created in Step 2.

[5] After downloading the Provisioning profile copy it to your/YourUserName/Library/MobileDevice/Provisioning Profile.


====== Step 4 ======


Now everything is step up, open your project in Xcode
[1] Click “i” Info button after selecting your project from “Group & File” in left side bar.

[2] Navigate to “Configuration” tab and select “Release”. Click the “Duplicate” button from bottom, name is “iphoneDistribution”.

[3] Click on “Build” tab and choose “iphoneDistribution” and enter in “Search in Build Settings” filed ‘Base SDK’ and select the current selected Device and  change to what gadget your application is targeting (I prefer “Device-iPhone OS 2.0)

[4] Now in “Search in build setting” field enter “code signing identity” and choose the provisioning profile created earlier in Step 3. Apply the same to the child property “Any iPhone OS Device”.

[5] Once this done close the Info screen and select the “Target”> “Your App” from “Group & File” in left side bar and click on “Info” button again from Xcode.

[6] To be on the safer side repeat step 3 and 4.

[7] With the Info screen still open click on “Properties” tab and enter “App Id”(i.e. com.vijay.iphoneapp) in Identifier field.

[8] Now that all is done, click on “Build” (cmd+B) from Xcode>Build.

[9] You will find your binary file created on right clicking on “Product”> “YourApp” and selecting “Reveal in Finder”. Zip this file.

====== Step 5 ======


The next step is to submit the binary file created to itunesconnect.
[1] In your browser type https://itunesconnect.apple.com/ (this website is very slow over https) and login using your iPhone developer account.

[2] Click on “Manage Your Account” > “Add Application”

[3] On replying to a simple question from apple you can sumbit your application to app store. You also need few things in your system before you submit your application.

a) Application Name (must be unique)

b) Application description

c) Application Category

d) URL for your application feedback.

e) Icon of your application in 512 x 512 size.

f) Main picture of your application in 320 x 480 or 320 x 460 size. (You have option to submit up to 4  more pictures of your application).

Wednesday, August 17, 2011

Creating an image thumbnail

-(void)imagePickerController:(UIImagePickerController *)picker didFinishPickingImage:(UIImage *)image editingInfo:(NSDictionary *)editingInfo{
 
// set the image we have chosen to the background of the current view. (OPTIONAL!)
imageView.image  = image;
 
// write the file to the TEMP Directory in the iphone, then when the user has completed
 
 
// selecting their image from the picker, we want to write both the full sized file, and the
 
// thumbnail to the /tmp directory for use later (whatever you want)
 
NSData *pngImage = UIImagePNGRepresentation(image);
 
if([pngImage writeToFile:[NSString stringWithFormat:@"%@/tempImage.png"
TEMP_FOLDER] atomically:YES]){
 
// now that we have saved our image, lets generate a thumbnail from that image, and
// save that one as well.
 
// lets essentially make a copy of the selected image.
 
 
UIImage *myThumbNail    = [[UIImage alloc] initWithData:pngImage];
 
// begin an image context that will essentially "hold" our new image
 
 
UIGraphicsBeginImageContext(CGSizeMake(60.0,60.0));
 
// now redraw our image in a smaller rectangle.
 
 
[myThumbNail drawInRect:CGRectMake(0.0, 0.0, 60.0, 60.0)];

 
// make a "copy" of the image from the current context
 
UIImage *newImage    = UIGraphicsGetImageFromCurrentImageContext();
 
UIGraphicsEndImageContext();
 
// create a new view to place on our screen (OPTIONAL-- testing)
 
UIImageView *thumbView    = [[UIImageView alloc] initWithFrame:CGRectMake(0.0, 0.0, 60.0, 60.0)];
 
thumbView.image    = newImage;
 
[self.view addSubview:thumbView];
 
// now grab the PNG representation of our image
 
NSData    *thumbData    = UIImagePNGRepresentation(newImage);
 
// now finally we can write our new thumbnail to the tmp directory on the phone.
 
 
if([thumbData writeToFile:[NSString stringWithFormat:@"%@/tempImageThumb.png", TEMP_FOLDER] atomically:YES]){
NSLog(@"thumb written!");
}
 
// close the modal view
 
[picker dismissModalViewControllerAnimated:YES];
 
}else{
 
// there was an error writing the image file to the tmp folder....
 
 
NSLog(@" there was an error writing the file to the temp directory");
   }
}

Apple Push Notification Service (steps required to build an iPhone application that utilizes Apple's Push Notification service.)

In this article, you will learn how to perform the various steps needed to create an iPhone application that uses the APNs.

Generating a Certificate Request

The first step to using the APNs is to generate a certificate request file so that you can use it to request for a development SSL certificate later on.
1. Launch the Keychain Access application in your Mac OS X.
2. Select Keychain Access'Certificate Assistant'Request a Certificate From a Certificate Authority (see Figure 1):
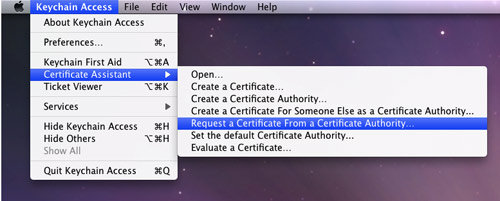
Figure 1. Generating a certificate request
3. Enter the information required and check the Saved to disk option. Click Continue (see Figure 2).
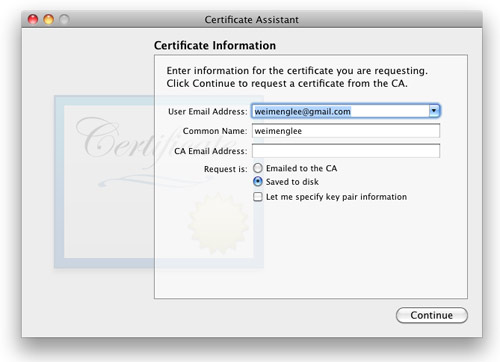
Figure 2. Saving the certificate request to disk
4. Save the certificate request using the suggested name and click Save (see Figure 3): Click Done in the next screen.

Figure 3. Naming the certificate request

Creating an App ID

Each iPhone applications that uses the APNs must have a unique application ID that uniquely identifies itself. In this step, you will learn how to create an App ID for push notification.
1. Sign in to the iPhone Developer Program at: http://developer.apple.com/iphone/. Click on the iPhone Developer Program Portal on the right of the page (see Figure 4).

Figure 4. Launching the iPhone Developer Program Portal
2. You should see the welcome page (see Figure 5).
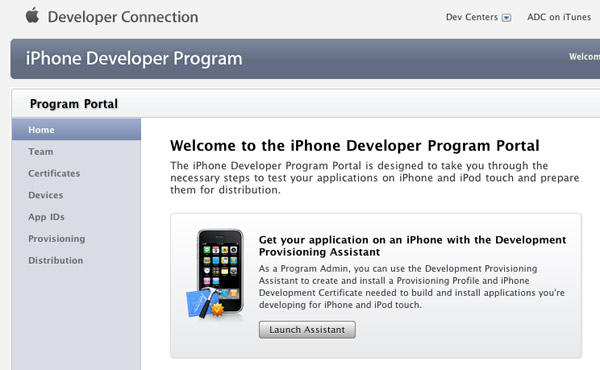
Figure 5. The welcome screen of the iPhone Developer Program Portal
3. Click on the App IDs tab on the left and then click on the New App ID button (see Figure 6).
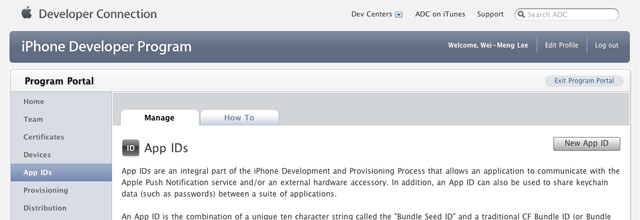
Figure 6. Clicking on the App ID tab
4. Enter "PushAppID" for the Description and select Generate New for the Bundle Seed ID. For the Bundle Identifier, enter net.learn2develop.MyPushApp. Click Submit (see Figure 7).
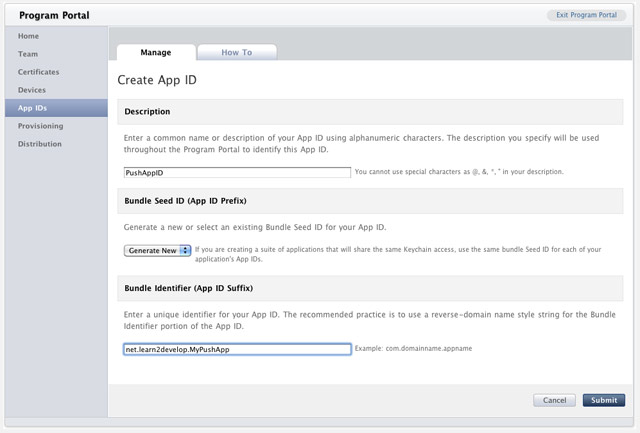
Figure 7. Creating a new App ID
5. You should now see the App ID that you have created (together with those you have previously created) (see Figure 8).

Figure 8. Viewing the newly created App ID

Configuring an App ID for Push Notifications

Once an App ID is created, you need to configure it for push notifications.
1. To configure an App ID for push notification, you need to click the Configure link displayed to the right of the App ID. You will now see the option (see Figure 9).
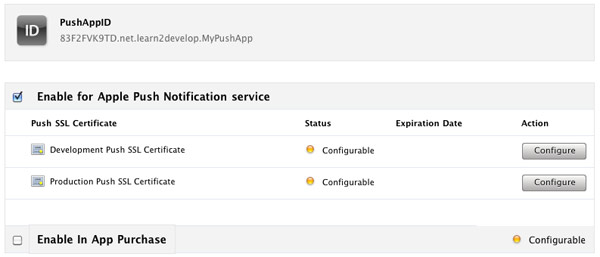
Figure 9. Configuring an App ID for push notification service
Check the Enable for Apple Push Notification service option and click the Configure button displayed to the right of the Development Push SSL Certificate.
2. You will now see the Apple Push Notification service SSL Certificate Assistant screen. Click Continue (see Figure 10).
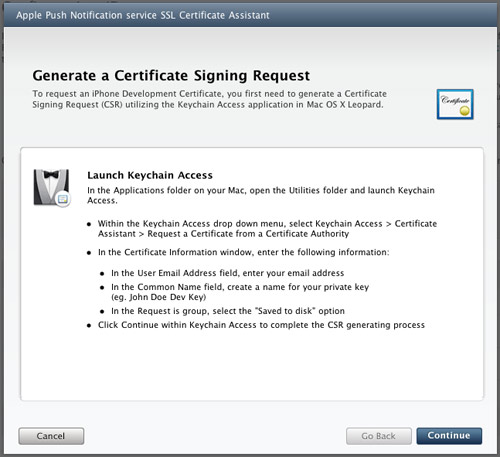
Figure 10. The Apple Push Notification service SSL Certificate Assistant screen
3. Click the Choose File button to locate the Certificate Request file that you have saved earlier. Click Generate (see Figure 11).
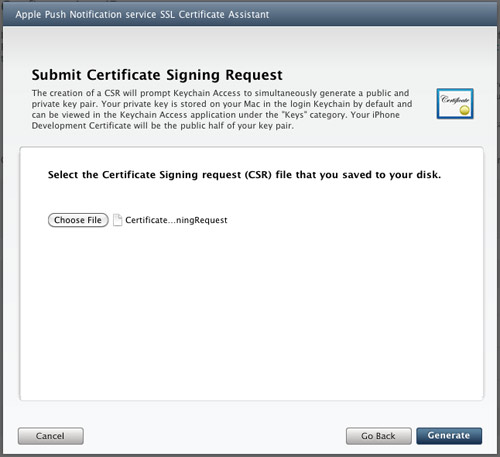
Figure 11. Generating the SSL certificate
4. Your SSL Certificate will now be generated. Click Continue (see Figure 12).
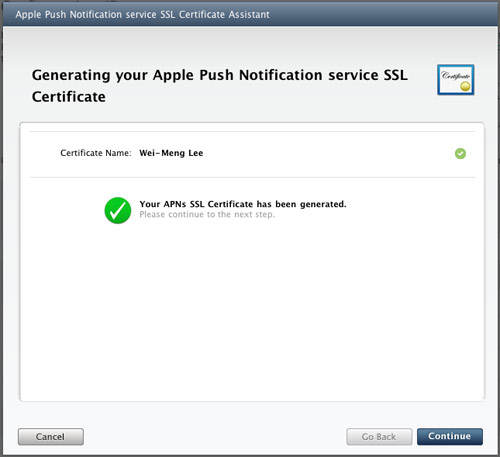
Figure 12. The APNs SSL certificate that is generated
5. Click the Download Now button to download the SSL Certificate. Click Done (see Figure 13).
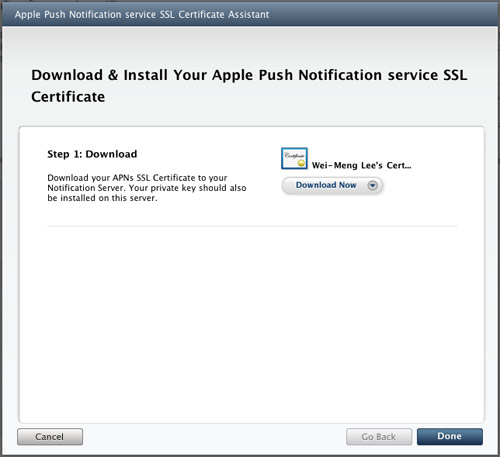
Figure 13. Downloading the certificate generated
6. The SSL Certificate that you download is named aps.developer.identity.cer. Double-click on it to install it in the Keychain Access application (see Figure 14). The SSL certificate will be used by your provider application so that it can contact the APNs to send push notifications to your applications.
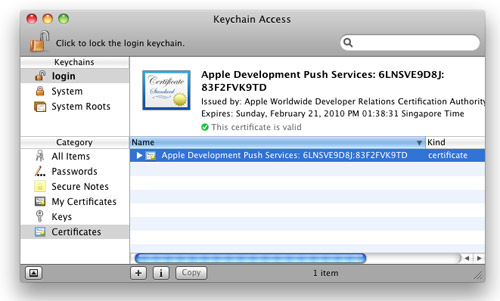
Figure 14. Installing the generated certificate into the Keychain Access application

Creating a Provisioning Profile

The next step is to create a provisioning profile so that your application can be installed onto a real device.
1. Back in the iPhone Development Program Portal, click on the Provisioning tab and click on the New Profile button (see Figure 15).

Figure 15. Selecting the Provisioning tab
2. Type in MyDevicesProfile as the profile name. Select PushAppID as the App ID. Finally, check all the devices that you want to provision (you can register these devices with the iPhone Developer Program Portal through the Devices tab). Click Submit (see Figure 16).
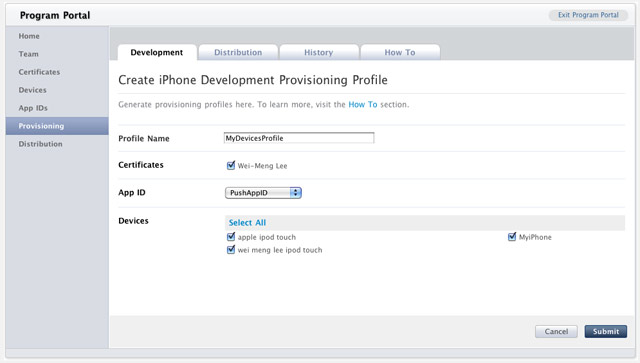
Figure 16. Creating a new provisioning profile
3. The provisioning profile will now be pending approval. After a while, you will see it appear. Click on the Download button to download the provisioning profile (see Figure 17).

Figure 17. Pending the approval of the provisioning profile
4. The downloaded provisioning profile is named MyDevicesProfile.mobileprovision.

Provisioning a Device

With the provision profile created, you will now install it onto a real device.
1. Connect your iPhone or iPod Touch to your Mac.
2. Drag and drop the downloaded MyDevicesProfile.mobileprovision file onto the Xcode icon on the Dock.
3. Launch the Organizer application from within Xcode and select the device currently connected to your Mac. You should see the MyDevicesProfile installed on the device (see Figure 18).
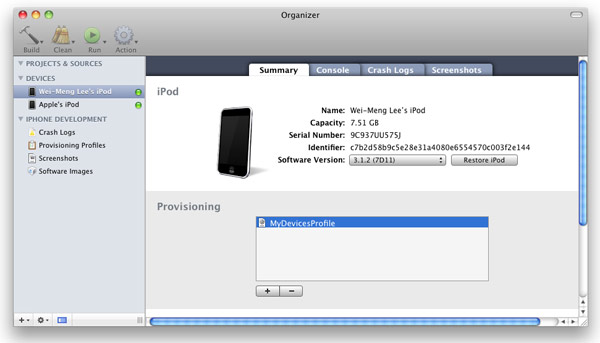
Figure 18. Viewing the installed provisioning profile

Creating the iPhone Application

1. In Xcode, create a new View-Based Application project and name it as ApplePushNotification.
2. Drag and drop a WAV file (shown as beep.wav in this example) onto the Resources folder in Xcode (see Figure 19).
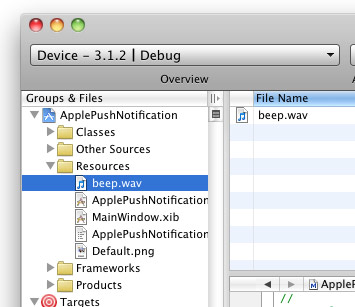
Figure 19. Adding a WAV file to the project
3. Expand on the Targets item in Xcode and select the ApplePushNotification item. Press Command-I. In the Info window, click the Properties tab (see Figure 20).
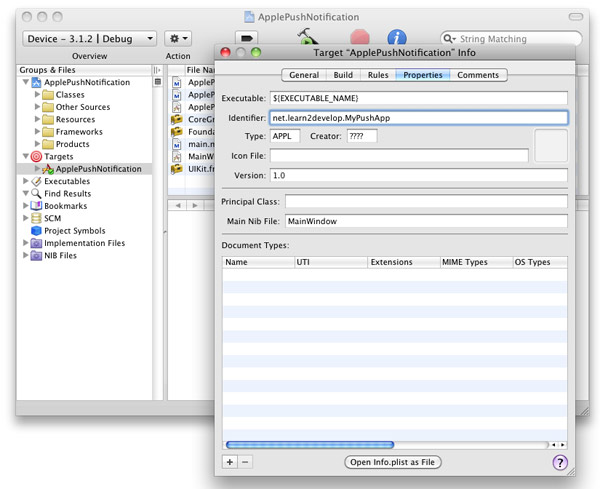
Figure 20. Entering the App ID for the application
In the Identifier textbox, type <net.learn2develop.MyPushApp.
4. Click on the Build tab and type "Code Signing" in the search box. In the Any iPhone OS Device item, select the profile as shown in Figure 21:
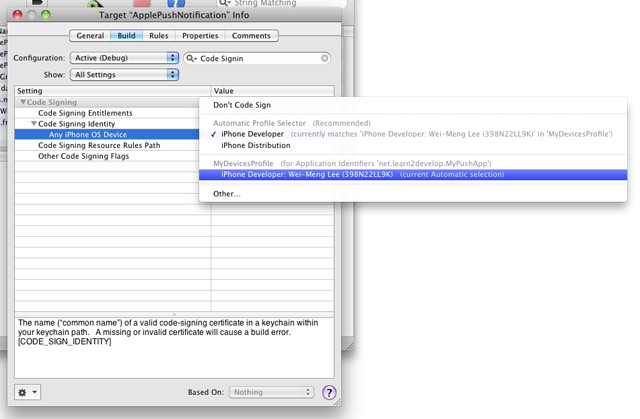
Figure 21. Selecting the profile for code signing
5. In the ApplePushNotificationAppDelegate.m file, type the following code in bold:
#import "ApplePushNotificationAppDelegate.h"
#import "ApplePushNotificationViewController.h"
 
@implementation ApplePushNotificationAppDelegate
 
@synthesize window;
@synthesize viewController;
 
- (void)applicationDidFinishLaunching:(UIApplication *)application {    
    [window addSubview:viewController.view];
    [window makeKeyAndVisible];
 
    NSLog(@"Registering for push notifications...");    
    [[UIApplication sharedApplication] 
        registerForRemoteNotificationTypes:
        (UIRemoteNotificationTypeAlert | 
         UIRemoteNotificationTypeBadge | 
         UIRemoteNotificationTypeSound)];
 
}
 
- (void)application:(UIApplication *)app didRegisterForRemoteNotificationsWithDeviceToken:(NSData *)deviceToken { 
 
    NSString *str = [NSString 
        stringWithFormat:@"Device Token=%@",deviceToken];
    NSLog(str);
 
}
 
- (void)application:(UIApplication *)app didFailToRegisterForRemoteNotificationsWithError:(NSError *)err { 
 
    NSString *str = [NSString stringWithFormat: @"Error: %@", err];
    NSLog(str);    
 
}
 
- (void)application:(UIApplication *)application didReceiveRemoteNotification:(NSDictionary *)userInfo {
 
    for (id key in userInfo) {
        NSLog(@"key: %@, value: %@", key, [userInfo objectForKey:key]);
    }    
 
}
 
- (void)dealloc {
    [viewController release];
    [window release];
    [super dealloc];
}
 
@end
6. Press Command-R to test the application on a real device. Press Shift-Command-R in Xcode to display the Debugger Console window. Observe carefully the device token that is printed (see Figure 22). In the figure below, the token is: 38c866dd bb323b39 ffa73487 5e157ee5 a85e0b7c e90d56e9 fe145bcc 6c2c594b. Record down this device token (you might want to cut and paste it into a text file).
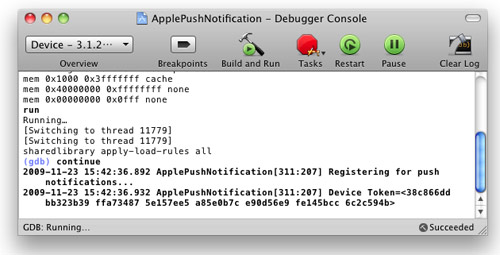
Figure 22. Viewing the device token for push notification
7. If you go to the Settings application on your iPhone/iPod Touch, you will notice that you now have the Notifications item (see Figure 23).
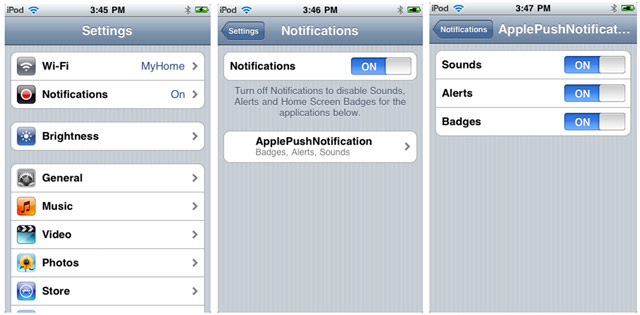
Figure 23. Viewing the Notifications item in the Settings application

Creating the Push Notification Provider

A Push Notification provider is an application written by the application's developer to send push notifications to the iPhone application through the APNs.
Here are the basic steps to send push notifications to your applications via the Apple Push Notification Service (APNs):
1. Communicate with the APNs using the SSL certificate you have created earlier.
2. Construct the payload for the message you want to send.
3. Send the push notification containing the payload to the APNs.
The APNs is a stream TCP socket that your provider can communicate using a SSL secured communication channel. You send the push notification (containing the payload) as a binary stream. Once connected to the APNs, you should maintain the connection and send as many push notifications as you want within the duration of the connection.
Tip: Refrain from opening and closing the connections to the APNs for each push notification that you want to send. Rapid opening and closing of connections to the APNs will be deemed as a Denial-of-Service (DOS) attack and may prevent your provider from sending push notifications to your applications.
The format of a push notification message looks like Figure 24 (figure from Apple's documentation):

Figure 24. Format of a push notification message
For more details, please refer to Apple Push Notification Service Programming Guide.
The payload is a JSON formatted string (maximum 256 bytes) carrying the information you want to send to your application. An example of a payload looks like this:
{
    "aps": { 
        "alert" : "You got a new message!" ,
        "badge" : 5, 
        "sound" : "beep.wav"},
     "acme1" : "bar", 
     "acme2" : 42
}
To save yourself the trouble in developing a push notification provider from scratch, you can use the PushMeBaby application (for Mac OS X) written by Stefan Hafeneger (Get it here).
1. Open the PushMeBaby application in Xcode.
2. Right-click on the Resources folder in Xcode and select Add Existing Files…. Select the aps.developer.identity.cer file that you have downloaded earlier (see Figure 25).
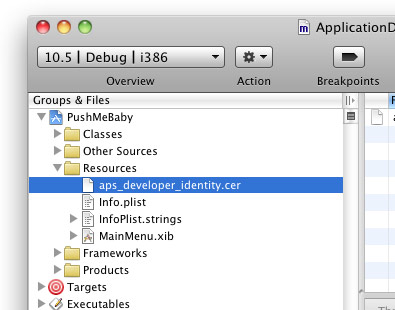
Figure 25. Adding the SSL certificate to the application
3. In the ApplicationDelegate.m file, modify the code as shown in bold below:
- (id)init {
    self = [super init];
    if(self != nil) {
        self.deviceToken = @"38c866dd bb323b39 ffa73487 5e157ee5 a85e0b7c e90d56e9 fe145bcc 6c2c594b";
 
        self.payload = @"{\"aps\":{\"alert\":\"You got a new message!\",\"badge\":5,\"sound\":\"beep.wav\"},\"acme1\":\"bar\",\"acme2\":42}";
 
        self.certificate = [[NSBundle mainBundle] 
            pathForResource:@"aps_developer_identity" ofType:@"cer"];
    }
    return self;
}
4. Press Command-R to test the application. You will be asked to grant access to the certificate. Click Always Allow (see Figure 26):
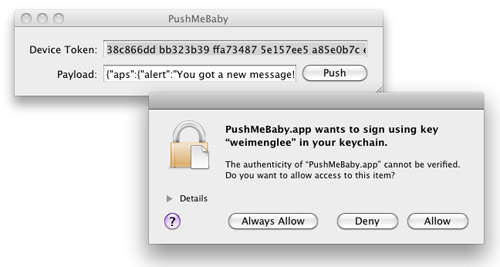
Figure 26. Granting access to the SSL certificate
On the iPhone/iPod Touch, ensure that the ApplePushNotification application is not running. To send a message to the device, click the Push button. The server essentially sends the following message to the Apple Push Notification server:
{
    "aps": { 
        "alert" : "You got a new message!" ,
        "badge" : 5, 
        "sound" : "beep.wav"},
     "acme1" : "bar", 
     "acme2" : 42
}
5. If the message is pushed correctly, you should see the notification as shown in Figure 27.
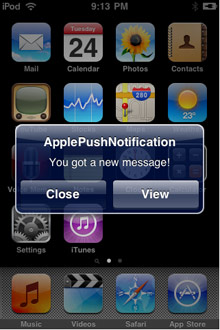
Figure 27. Receiving a Push Notification message
6. If you now debug the ApplePushNotification application by pressing Command-R and send a push message from the PushMeBaby application, the Debugger Console window will display the following outputs:
2009-11-24 21:11:49.182 ApplePushNotification[1461:207] key: acme1, value: bar
2009-11-24 21:11:49.187 ApplePushNotification[1461:207] key: aps, value: {
    alert = "You got a new message!";
    badge = 5;
    sound = "beep.wav";
}
2009-11-24 21:11:49.191 ApplePushNotification[1461:207] key: acme2, value: 42

Summary

In this article, you have seen the various steps required to build an iPhone application that utilizes Apple's Push Notification service.

Tuesday, August 16, 2011

Slide to Unlock .... Feel :-)


For this look and feel you need in .h file :-
Nothing.png 

slideButton.png 

Container.png 

#import <UIKit/UIKit.h>

@interface SlideToUnlockViewController : UIViewController {
   
    IBOutlet UISlider *slideToUnlock;
    IBOutlet UIButton *lockButton;
    IBOutlet UILabel *myLabel;
    IBOutlet UIImageView *Container;

}

@property (nonatomic, retain) UISlider *slideToUnlock;
@property (nonatomic, retain) UIButton *lockButton;
@property (nonatomic, retain) UILabel *myLabel;
@property (nonatomic, retain) UIImageView *Container;

-(IBAction)UnLockIt;
-(IBAction)LockIt;
-(IBAction)fadeLabel;

@end


and in .m file :- 

@synthesize slideToUnlock, myLabel, lockButton, Container;

BOOL UNLOCKED = NO;


- (void)viewDidLoad {

    [super viewDidLoad];

    // initialize custom UISlider (you have to do this in viewdidload or applicationdidfinishlaunching.
  
UIImage *stetchLeftTrack= [[UIImage imageNamed:@"Nothing.png"]
                      stretchableImageWithLeftCapWidth:30.0 topCapHeight:0.0];
  
UIImage *stetchRightTrack= [[UIImage imageNamed:@"Nothing.png"]
                       stretchableImageWithLeftCapWidth:30.0 topCapHeight:0.0];
   
[slideToUnlock setThumbImage: [UIImage imageNamed:@"SlideToStop.png"] forState:UIControlStateNormal];
 
  [slideToUnlock setMinimumTrackImage:stetchLeftTrack forState:UIControlStateNormal];
 
  [slideToUnlock setMaximumTrackImage:stetchRightTrack forState:UIControlStateNormal];
   
}


-(IBAction)LockIt {
   
    slideToUnlock.hidden = NO;
  
    lockButton.hidden = YES;
  
    Container.hidden = NO;
  
    myLabel.hidden = NO;
   
   myLabel.alpha = 1.0;
   
   UNLOCKED = NO;
   
   slideToUnlock.value = 0.0;
  
    NSString *str = @"The iPhone is Locked!";
  
   UIAlertView *alert = [[UIAlertView alloc] initWithTitle:@"Locked" message:str delegate:self cancelButtonTitle:nil otherButtonTitles:@"OK", nil];
 
    [alert show];
  
   [alert release];
}

       -(IBAction)fadeLabel {

    myLabel.alpha = 1.0 - slideToUnlock.value;
   
   }

       -(IBAction)UnLockIt {

   
         if (!UNLOCKED) {


        if (slideToUnlock.value ==1.0) {  // if user slide far enough, stop the operation   
          
  // Put here what happens when it is unlocked
           
            slideToUnlock.hidden = YES;
          
           lockButton.hidden = NO;
         
          Container.hidden = YES;
       
            myLabel.hidden = YES;
          
         UNLOCKED = YES;
      
      }
      else
            {
            // user did not slide far enough, so return back to 0 position
         
             [UIView beginAnimations: @"SlideCanceled" context: nil];
          
             [UIView setAnimationDelegate: self];
       
            [UIView setAnimationDuration: 0.35];
           
              // use CurveEaseOut to create "spring" effect
         
            [UIView setAnimationCurve: UIViewAnimationCurveEaseOut];   
       
            slideToUnlock.value = 0.0;
           
            [UIView commitAnimations];
           
           
            }
       
      }
   
  }


Monday, August 15, 2011

Download Data From The Web

Designing the User Interface:- 


#import <UIKit/UIKit.h>

@interface DownloadViewController : UIViewController <UITextFieldDelegate>{
    UITextField *urlName;
    UIProgressView *progressView;
    UILabel *progressLabel;
    NSMutableData *receivedData;
    long DownloadingLength;
}

@property (nonatomic, retain) IBOutlet UILabel *progressLabel;
@property (nonatomic, retain) IBOutlet UIProgressView *progressView;
@property (nonatomic, retain) IBOutlet UITextField *urlName;


-(IBAction)startDownload;
-(void)saveData:(NSMutableData*)data toFile:(NSString*)file;

@end
The progressLabel has to show how many bytes have been downloaded and the progressView shows the progress of the download.
The user has to paste in the URL, of the data on the web, into the urlName and click on the button to download the data.
We declare one simple IBAction, that gets called, when the download finishes and a method to save the data with a given name into the documents directory.
nIn .m file 

@synthesize urlName, progressView, progressLabel;
Implementing the NSURLDelegate
Then we have to implement the IBAction we’ve declared in the header file :
-(IBAction)startDownload {
    progressLabel.text = @"0 Bytes";
    progressView.progress = 0.0f;
    NSURL *url = [[NSURL alloc] initWithString:urlName.text];
    NSURLRequest *request = [[NSURLRequest alloc] initWithURL:url];
    NSURLConnection *connection = [[NSURLConnection alloc] initWithRequest:request delegate:self startImmediately:true];
    [connection release];
    [request release];
    [url release];
    receivedData = [[NSMutableData alloc] init];
}
Ok. The next thing we have to do is to implement the needed methods from the NSURLConnection delegate :


-(void)connection:(NSURLConnection *)connection didReceiveData:(NSData *)data {
    if (data != nil) {
        [receivedData appendData:[[NSData alloc] initWithData:data]];  
    }
    progressLabel.text = [NSString stringWithFormat:@"%d Bytes",[receivedData length]];
    if (DownloadingLength <= 0) {
        return;
    }
        
float a = [receivedData length];
    float b = DownloadingLength;
    NSNumber *progress = [NSNumber numberWithFloat:a/b];
   
    progressView.progress = [progress floatValue];
}

-(void)connection:(NSURLConnection *)connection didFailWithError:(NSError *)error {
    UIAlertView *alert = [[UIAlertView alloc] initWithTitle:@"Error" message:@"Downloading not Completed" delegate:nil cancelButtonTitle:@"Ok" otherButtonTitles:nil];
    [alert show];
    [alert release];
    [receivedData release];
}

-(void)connectionDidFinishLoading:(NSURLConnection *)connection {
    UIAlertView *alert = [[UIAlertView alloc] initWithTitle:@"Alert" message:@"Download complete" delegate:nil cancelButtonTitle:@"Ok" otherButtonTitles:nil];
    [alert show];
    [alert release];
    [self saveData:receivedData toFile:@"vijay.dat"];
    [receivedData release];
}

-(void)connection:(NSURLConnection *)connection didReceiveResponse:(NSURLResponse *)response {
    DownloadingLength = [response expectedContentLength];
}
The SaveToFile Method
Now there’s only one thing left.
The save method :
-(void)saveData:(NSMutableData *)data toFile:(NSString *)file {
    NSArray *paths = NSSearchPathForDirectoriesInDomains(NSDocumentDirectory, NSUserDomainMask, true);
    NSString *temp = [paths objectAtIndex:0];
    temp = [temp stringByAppendingPathComponent:file];
    [data writeToFile:temp atomically:true];
}

Monday, August 1, 2011

Take Photo from iPhone And Upload to server


- (IBAction)TakeImage {

     self.imgPicker = [[UIImagePickerController alloc] init];
    self.imgPicker.sourceType = UIImagePickerControllerSourceTypeCamera;
    self.imgPicker.allowsImageEditing = YES;
    self.imgPicker.delegate = self;   
    [self presentModalViewController:self.imgPicker animated:YES];
}


- (void)imagePickerController:(UIImagePickerController *)picker didFinishPickingImage:(UIImage *)img editingInfo:(NSDictionary *)editInfo {
   
image.image = img;   
  
[[picker parentViewController] dismissModalViewControllerAnimated:YES];
   
      }


- (IBAction)uploadImage {
   NSData *imageData = UIImageJPEGRepresentation(image.image, 0.1); //Here 0.1 is to compress the image size..
     
  NSString *imgDataStr = [[NSString alloc] initWithData:imageData encoding:NSUTF8StringEncoding];
 
      NSString *urlString = @"Your URL where you want to upload";
   
    // setting up the request object now
  
NSMutableURLRequest *request = [[[NSMutableURLRequest alloc] init] autorelease];
 
  [request setURL:[NSURL URLWithString:urlString]];
  
[request setHTTPMethod:@"POST"];
       
    NSString *boundary = [NSString stringWithString:@"---------------------------14737809831466499882746641449"];


    NSString *contentType = [NSString stringWithFormat:@"multipart/form-data; boundary=%@",boundary];
  

[request addValue:contentType forHTTPHeaderField: @"Content-Type"];
   
    /*
     now lets create the body of the post
     */
   
    NSMutableData *body = [NSMutableData data];
   
[body appendData:[[NSString stringWithFormat:@"\r\n--%@\r\n",boundary] dataUsingEncoding:NSUTF8StringEncoding]];   
  

[body appendData:[[NSString stringWithFormat:@"Content-Disposition: form-data; name=\"userfile\"; filename=\"%@\"\r\n", self.imagename] dataUsingEncoding:NSUTF8StringEncoding]];

    [body appendData:[[NSString stringWithString:@"Content-Type: application/octet-stream\r\n\r\n"] dataUsingEncoding:NSUTF8StringEncoding]];
 
  [body appendData:[NSData dataWithData:imageData]];
 
  [body appendData:[[NSString stringWithFormat:@"\r\n--%@--\r\n",boundary] dataUsingEncoding:NSUTF8StringEncoding]];
    // setting the body of the post to the reqeust
   
    [request setHTTPBody:body];
 
  NSString *requestDataStr = [[NSString alloc] initWithData:body encoding:NSUTF8StringEncoding];
      
    // now lets make the connection to the web
    NSData *returnData = [NSURLConnection sendSynchronousRequest:request returningResponse:nil error:nil];
 
  NSString *returnString = [[NSString alloc] initWithData:returnData encoding:NSUTF8StringEncoding];
   
  }

Take Video from iPhone And Upload to server

-(IBAction)displayCamera :(id)sender
{
 
    BOOL canShootVideo = [UIImagePickerController isSourceTypeAvailable:UIImagePickerControllerSourceTypeCamera];
   
    if (canShootVideo) {
        UIImagePickerController *videoRecorder = [[UIImagePickerController alloc] init];
        videoRecorder.sourceType = UIImagePickerControllerSourceTypeCamera;
      
        videoRecorder.cameraDevice = UIImagePickerControllerCameraDeviceRear;
        videoRecorder.videoMaximumDuration = 5;
        BOOL capture = [videoRecorder startVideoCapture];
      
        videoRecorder.delegate = self;
       
        NSArray *mediaTypes = [UIImagePickerController availableMediaTypesForSourceType:UIImagePickerControllerSourceTypeCamera];
        NSArray *videoMediaTypesOnly = [mediaTypes filteredArrayUsingPredicate:[NSPredicate predicateWithFormat:@"(SELF contains %@)", @"movie"]];
        BOOL movieOutputPossible = (videoMediaTypesOnly != nil);
       
        if (movieOutputPossible) {
            videoRecorder.mediaTypes = videoMediaTypesOnly;
           
            [self presentModalViewController:videoRecorder animated:YES];          
        }
        [videoRecorder release];
    }
   
   
    else
    {
        UIAlertView *alert = [[UIAlertView alloc]initWithTitle:@"Camera Demo" message:@"Device Lacks Camera" delegate:nil cancelButtonTitle:@"Cancel" otherButtonTitles:@"Ok", nil];
       
        [alert show];
        [alert release];
    }
   
}
- (void) imagePickerController: (UIImagePickerController *) picker didFinishPickingMediaWithInfo: (NSDictionary *) info {
   
      NSString *mediaType = [info objectForKey:UIImagePickerControllerMediaType];
   
    //check the media type string so we can determine if its a video
    if ([mediaType isEqualToString:@"public.movie"]){
               NSURL *videoURL = [info objectForKey:UIImagePickerControllerMediaURL];
               NSData *webData = [NSData dataWithContentsOfURL:videoURL];
             [self post:webData];
 
       
    }
   
   
}


- (void)post:(NSData *)fileData{
   
    NSMutableURLRequest* post = [NSMutableURLRequest requestWithURL: [NSURL URLWithString: @"Your URL where you want to post video"]];
    [post setHTTPMethod: @"POST"];
   
   
    NSString *boundary = [NSString stringWithString:@"---------------------------358734318367435438734347"];
   
    NSString *contentType = [NSString stringWithFormat:@"multipart/form-data; boundary=%@",boundary];
   
    [post addValue:contentType forHTTPHeaderField: @"Content-Type"];
   
   
    NSMutableData *body = [NSMutableData data];
   
    [body appendData:[[NSString stringWithFormat:@"\r\n--%@\r\n",boundary] dataUsingEncoding:NSUTF8StringEncoding]];
   
    //[body appendData:[[NSString stringWithFormat:@"Content-Disposition: form-data; name=\"userfile\"; filename=\"vijay.mpeg\"\r\n", ] dataUsingEncoding:NSUTF8StringEncoding]];

   
    [body appendData:[[NSString stringWithFormat:@"Content-Disposition: form-data; name=\"userfile\"; filename=\"%@\"\r\n", self.videoName] dataUsingEncoding:NSUTF8StringEncoding]];
   
    [body appendData:[[NSString stringWithString:@"Content-Type: application/octet-stream\r\n\r\n"] dataUsingEncoding:NSUTF8StringEncoding]];
   
    [body appendData:fileData];
   
    [body appendData:[[NSString stringWithFormat:@"\r\n--%@--\r\n",boundary] dataUsingEncoding:NSUTF8StringEncoding]];
   
   
    [post setHTTPBody:body];
   
    NSData *returnData = [NSURLConnection sendSynchronousRequest:post returningResponse:nil error:nil];
   
    NSString *returnString = [[NSString alloc] initWithData:returnData encoding:NSUTF8StringEncoding];


}

How to Write in iPad on finger move


- (void)touchesBegan:(NSSet *)touches withEvent:(UIEvent *)event {
   
    mouseSwiped = NO;
    UITouch *touch = [[event allTouches] anyObject];
   
    lastPoint = [touch locationInView:self.view];
    lastPoint.y -=180;
    lastPoint.x -=90;
    CGPoint location = [touch locationInView:self.view];
    imageView.center = location;

    }


- (void)touchesMoved:(NSSet *)touches withEvent:(UIEvent *)event {

    mouseSwiped = YES;
       
    UITouch *touch = [[event allTouches] anyObject];
    CGPoint location = [touch locationInView:self.view];
    imageView.center = location;

       
    {       
        CGPoint currentPoint = [touch locationInView:self.view];
        currentPoint.y -=180;
        currentPoint.x -=90;
       
        UIGraphicsBeginImageContext(drawImage.frame.size);
        [drawImage.image drawInRect:CGRectMake(0, 0, 618, 636)];


        CGContextSetLineCap(UIGraphicsGetCurrentContext(), kCGLineCapRound);
        CGContextSetLineWidth(UIGraphicsGetCurrentContext(), 5.0);
       
        if (isWritingEnabled) {
            CGContextSetRGBStrokeColor(UIGraphicsGetCurrentContext(), 1.0, 0.0, 0.0, 1.0);           
        }
         else
{
             CGContextSetLineWidth(UIGraphicsGetCurrentContext(),15);
            CGContextSetBlendMode(UIGraphicsGetCurrentContext(), kCGBlendModeClear);
        }
        CGContextBeginPath(UIGraphicsGetCurrentContext());
        CGContextMoveToPoint(UIGraphicsGetCurrentContext(), lastPoint.x, lastPoint.y);
        CGContextAddLineToPoint(UIGraphicsGetCurrentContext(), currentPoint.x, currentPoint.y);
        CGContextStrokePath(UIGraphicsGetCurrentContext());
        drawImage.image = UIGraphicsGetImageFromCurrentImageContext();


        UIGraphicsEndImageContext();
       
        lastPoint = currentPoint;
       
    }
   
}

- (void)touchesEnded:(NSSet *)touches withEvent:(UIEvent *)event {
   
   
        if(!mouseSwiped) {
            UIGraphicsBeginImageContext(drawImage.frame.size);
            [drawImage.image drawInRect:CGRectMake(0, 0, 618, 636)];
            CGContextSetLineCap(UIGraphicsGetCurrentContext(), kCGLineCapRound);
            CGContextSetLineWidth(UIGraphicsGetCurrentContext(), 5.0);
            CGContextSetRGBStrokeColor(UIGraphicsGetCurrentContext(), 1.0, 0.0, 0.0, 1.0);
            CGContextMoveToPoint(UIGraphicsGetCurrentContext(), lastPoint.x, lastPoint.y);
            CGContextAddLineToPoint(UIGraphicsGetCurrentContext(), lastPoint.x, lastPoint.y);
            CGContextStrokePath(UIGraphicsGetCurrentContext());
            CGContextFlush(UIGraphicsGetCurrentContext());
           
            drawImage.image = UIGraphicsGetImageFromCurrentImageContext();
            UIGraphicsEndImageContext();
        }
   
   
}