Thursday, December 1, 2011

MD5 Encryption in iPhone

#import <CommonCrypto/CommonDigest.h>//plz add coremobile and coretext framework....


NSString *str = urdata;// place your data here that you want to encrypt.....

        const char *cStr = [str UTF8String];

        unsigned char result[CC_MD5_DIGEST_LENGTH];

       CC_MD5( cStr, strlen(cStr), result );

        NSString *qrEncryptdata = [NSString stringWithFormat:
                                 @"%02X%02X%02X%02X%02X%02X%02X%02X%02X%02X%02X%02X%02X%02X%02X%02X",
                                 result[0], result[1], result[2], result[3], result[4], result[5], result[6], result[7],
                                 result[8], result[9], result[10], result[11], result[12], result[13], result[14], result[15]
                                 ];
       
        NSLog(@"qrEncryptdata = |%@|",qrEncryptdata);


Tuesday, October 25, 2011

custom camera overlay :)

-(void)viewDidLoad{
self.overlayView = [[UIView alloc] init];
    self.overlayView.frame = CGRectMake(0, 0, 320, 480);
   
   
    NSMutableArray *toolButtons = [NSMutableArray arrayWithCapacity:8];
   
    UIBarButtonItem *btn;
   
       
    UIImage *photogallaryBtnImg = [UIImage imageNamed:@"photo-gallery.png"];
    UIBarButtonItem * photogallaryBtn = [[UIBarButtonItem alloc] initWithImage:photogallaryBtnImg style:UIBarButtonItemStylePlain target:self action:@selector(grabImage:)];
    [toolButtons addObject:photogallaryBtn];
    [photogallaryBtn release];
   
    btn = [[UIBarButtonItem alloc] initWithBarButtonSystemItem:UIBarButtonSystemItemFlexibleSpace target:nil action:nil];
    [toolButtons addObject:btn];
    [btn release];
   
   
    UIImage *cameraBtnImg = [UIImage imageNamed:@"camera.png"];
    UIBarButtonItem *cameraBtn = [[UIBarButtonItem alloc] initWithImage:cameraBtnImg style:UIBarButtonItemStylePlain target:self action:@selector(camera:)];
    [toolButtons addObject:cameraBtn];
    [cameraBtn release];
   
    btn = [[UIBarButtonItem alloc] initWithBarButtonSystemItem:UIBarButtonSystemItemFlexibleSpace target:nil action:nil];
    [toolButtons addObject:btn];
    [btn release];
   
    UIImage *flashImg = [UIImage imageNamed:@"flashlight.png"];
    UIBarButtonItem *flashBtn = [[UIBarButtonItem alloc] initWithImage:flashImg style:UIBarButtonItemStylePlain target:self action:@selector(flashLightBtnPressed:)];
    [toolButtons addObject:flashBtn];
    [flashBtn release];
   
    btn = [[UIBarButtonItem alloc] initWithBarButtonSystemItem:UIBarButtonSystemItemFlexibleSpace target:nil action:nil];
    [toolButtons addObject:btn];
    [btn release];
   
    UIImage *crossImg = [UIImage imageNamed:@"camera-cancel.png"];
    UIBarButtonItem *crossBtn = [[UIBarButtonItem alloc] initWithImage:crossImg style:UIBarButtonItemStylePlain target:self action:@selector(crossBtnClicked:)];
    [toolButtons addObject:crossBtn];
    [crossBtn release];
   
   
    toolBar = [[UIToolbar alloc] initWithFrame:CGRectMake(0,415, 320, 44)];
    toolBar.items = toolButtons;
    NSLog(@"toolBar.items ...%d",[toolBar.items count]);
    toolBar.barStyle = UIBarStyleDefault;
    [self.overlayView addSubview:toolBar];
    [toolBar release];
   
    UIImageView *footimage = [[UIImageView alloc] initWithImage:[UIImage imageNamed:@"foot.png"]];
    footimage.frame = CGRectMake(80,0,138 ,333);
   
    [footimage setContentMode:UIViewContentModeScaleToFill];
    footimage.backgroundColor = [UIColor clearColor];
    [self.overlayView addSubview:footimage];
   
    [self performSelector:@selector(takePhoto:) withObject:nil afterDelay:0.1];

}

- (void)takePhoto:(id)sender {
    [[UIApplication sharedApplication] setStatusBarHidden:NO];
    self.imgPicker = [[UIImagePickerController alloc] init];
    self.imgPicker.sourceType = UIImagePickerControllerSourceTypeCamera;       
    self.imgPicker.showsCameraControls = NO;
    self.imgPicker.cameraOverlayView = self.overlayView;
    [self presentModalViewController:self.imgPicker animated:YES];
   
    NSLog(@"camera opnnn....");
   
   
}
- (void)camera:(id)sender{
    [self.imgPicker takePicture];
    self.imgPicker.delegate = self;

    NSLog(@"cameraf opnnn....");
}

- (void)imagePickerController:(UIImagePickerController *)picker didFinishPickingImage:(UIImage *)img editingInfo:(NSDictionary *)editInfo {
    image.image = img;   
    NSLog(@"delegate camera");
    [[picker parentViewController] dismissModalViewControllerAnimated:YES];
}

- (IBAction)crossBtnClicked:(id)sender{
    NSLog(@"crossbtn");
    [[self.imgPicker parentViewController] dismissModalViewControllerAnimated:YES];
    [self.tabBarController setSelectedIndex:3];

}
- (IBAction)grabImage:(id)sender  {
    NSLog(@"grabImage");
    [[UIApplication sharedApplication] setStatusBarHidden:NO];
    self.imgPicker.sourceType = UIImagePickerControllerSourceTypePhotoLibrary;
    self.imgPicker.delegate = self;       
    [self presentModalViewController:self.imgPicker animated:YES];
}
- (IBAction)flashLightBtnPressed:(id)sender
{
    if (self.imgPicker.cameraFlashMode == UIImagePickerControllerCameraFlashModeOff) {
        [self.imgPicker setCameraFlashMode:UIImagePickerControllerCameraFlashModeOn];
    }else {
        [self.imgPicker setCameraFlashMode:UIImagePickerControllerCameraFlashModeOff];

    }

}


Wednesday, October 19, 2011

How to create free account on itune....:)

Select a free app to download.  A simple way to do this is to scroll down to the Top Free Apps box on the right side, hover your mouse over the first item, and click on the Free button that appears when you hover over it.
sshot-621
A popup will open asking you to sign in with your Apple ID.  Click “Create New Account”.
sshot-622
Click Continue to create your account.
sshot-623
Check the box to accept the Store Terms and Conditions, and click Continue.
sshot-624
Enter your email address, password, security question, and date of birth, and uncheck the boxes to get email if you don’t want it…then click Continue.
sshot-2010-03-18-[20-42-52]
Now, you will be asked to provide a payment method.  Notice now that the last option says None!  Click that bullet option…
sshot-626
Then enter your billing address.  Simply enter your normal billing address, even though you are not entering a payment method.  Click Continue and your account will be created!
sshot-627
If you get the Address Verification screen just verify your county and click Done.
sshot-2010-03-18-[20-47-26]
An email will be sent to you to verify your account…
sshot-2010-03-18-[20-48-33]
Click on the link in your email to verify your account, iTunes will launch and you’re prompted to enter in the Apple ID and Password you just created.
sshot-2010-03-18-[20-55-24]
Your account is successfully created!
sshot-2010-03-18-[20-56-17]

Tips & Tricks: Installing an iPhone or iPad App with Provisioning Profile

To install an iPhone or iPad application on a limited number of devices, use the method of distribution called “Ad hoc”.


uses iTunes. First connect your iPhone to the computer. When your iPhone it detected by iTunes, click and go to the “Summary” tab.

iphone app development - itunes 1

Then click on “Serial Number”. The field will change to “Login (UDID)”.

iphone app development - itunes 2

You just have to copy the UDID “ + c” in mac or “Ctrl + c” under Windows. Now you can copy it to your e-mail.

Once you have communicated your UDID, just continue with the last two Ad Hoc distribution steps.

STEP 2 – The application is compiled and signed with the distribution profile. It is in this profile that devices authorized to the run application are listed.

STEP 3 - Deploying the application on your device.

Let’s now focus on this last step, where two files are needed:

  • A compressed file containing the provisioning profile (valid for a limited time).

  • A compressed file containing the application.

These two files (once unzipped) should be dragged on the iTunes icon:

iphone app development - itunes 3

Note: iTunes may ask you to replace the existing application or profile.

Once copied, you simply synchronize your device. Please note that a newly installed application will be displayed on the first application screen in on the first available spot, and not on the last application page.

Tuesday, September 20, 2011

App Store Approval Process +iphone app


this is from ......
 https://developer.apple.com/appstore/resources/approval/


App Store Approval Process

Ensure your app is ready for the approval process

Read the App Store Review Guidelines

Before you submit your app for approval, ensure that it follows the technical, design, and content specifications detailed in the App Store Review Guidelines and Human Interface Guidelines. Apps that do not follow these guidelines will be returned for modification before they can be posted to the App Store. Read the Guidelines       View additional app review resources
App Store Review Guidelines

Test on Devices

Test your app thoroughly on iPad, iPhone, and iPod touch before uploading it to iTunes Connect. The iPhone Simulator is ideal for prototyping your ideas, debugging memory leaks, simulating memory warnings, and getting a good feel for how your app is going to work. However, since the iPhone Simulator simulates iOS, not hardware, it is not a replacement for testing on an actual device.

What to expect during the review of your app

App Store Review Status

iOS submissions reviewed within the last 7 days:

97%
New Apps

99%
App Updates

The App Review Team checks every app submitted in order to protect consumer privacy, safeguard children from inappropriate content, and avoid applications that degrade the core experience of iPad, iPhone, and iPod touch. All aspects of your app must comply with the criteria outlined in the App Store Review Guidelines and should conform to the iPhone and iPad Human Interface Guidelines.
After your app has been reviewed and approved, it will be set to the Ready for Sale state (or Pending Contract if your contracts are not yet in effect). If an issue is discovered during the review of your app, you will receive an email detailing the reason why the application cannot be approved as submitted. This email will provide you with a description of the issue and in many cases also provide instructions and related technical documentation to help you resolve the issue. We encourage you to modify your app and resubmit it for review.
If you have any questions about the information you receive from the App Review Team, you can send an email to appreview@apple.com. In addition, you may appeal the rejection of your app to the App Review Board. Should you need code-level assistance in making modifications to your app, you can contact Apple Developer Technical Support. Visit the Support Center for details about requesting technical support.

Check the status of your app in iTunes Connect

Once youʼve reviewed and submitted your app, you will be taken back to the Manage your Applications page. Here youʼll find the application name, version, date submitted, Apple ID, as well as the status of your application. There are 16 colored status indicators that can appear on the Manage Your Applications page after submitting an app. Log in to iTunes Connect
Waiting for Upload (Yellow)
Appears when you've completed entering your metadata, however, you have not finished uploading your binary or have chosen to upload your binary at a later time. Your app must be in the Waiting For Upload state before you can deliver your binary through Application Loader.


Prepare for Upload (Yellow)
Appears when you have created a new version, but you have not yet clicked the Ready to Submit Binary button. This state also indicates that you can now deliver your binary through Application Loader.


Upload Received (Yellow)
Appears when your binary has been received through Application Loader, but is still being processed by the iTunes Connect system.


Invalid Binary (Red)
Appears when a binary is received through Application Loader, has been processed, but your binary is invalid.  Examples of an invalid binary are: your binary icon does not meet our requirements, you have placed the payload directory at the wrong level in the .app wrapper, you attempted to use a non-increasing CFBundleVersion, etc.


Missing Screenshot (Red)
Appears when your app is missing a required screenshot for iPhone and iPod touch or iPad for your default language app or for your added localizations. At least one screenshot is required for both iPhone and iPod touch and for iPad if you are submitting a universal app.


Waiting for Review (Yellow)
Appears after you submit a new application or update and prior to the application being reviewed by Apple. This status means that your app has been added to the app review queue, but has not yet started the review process.


Waiting For Export Compliance (Yellow)

Appears when your CCATS is in review with Export Compliance.


In Review (Yellow)
Appears when we are reviewing your app prior to the application being approved or rejected. It takes time to review binaries so we appreciate your patience and ask that you allow sufficient time for the processing of your application.  When the status of your application is in review, you have the option to reject the binary you have submitted by clicking Reject Binary. This will remove your binary from the review queue and will allow for another update to be submitted. If you reject your binary, the status of your app will change to Developer Rejected and when your binary is re-submitted, the review process will start over from the beginning.


Pending Contract (Yellow)
Appears when your application has been reviewed and is Ready for Sale but your contracts are not yet in effect. You may check the progress of your contracts in iTunes Connect by clicking on the Contracts, Tax & Banking information module.


Pending Developer Release (Yellow)
Appears when the version of your app has been approved by Apple and you have turned on the Version Release Control, but have not yet clicked Send Version Live. You should also see a pending action symbol on the version. Your version will remain in this state, and thus will not be live on the App Store until you click Send Version Live.


Processing for App Store (Yellow)
Appears when the version is being processed to go live on the App Store. Once the processing is complete, the version state will change to "Ready for Sale." This is a temporary state (approx. 1 - 2 hours). 


Ready for Sale (Green)
Appears once your application been approved and posted to the App Store. When your application is in this status, you have the option to remove it from the store by going to the Rights and Pricing page and removing all App Store territories.


Rejected (Red)
Appears when the binary has been rejected.


Removed from Sale (Red)
Appears when the binary has been removed from the App Store.


Developer Rejected (Red)
Appears when youʼve rejected the binary from the review process. Existing versions of your application on the App Store will not be affected by self-rejecting binaries in review.


Important: When you self-reject your binary, you lose your place in the review queue. Your binary will be placed at the end of the queue when you resubmit.
Developer Removed from Sale (Red)
Appears when you’ve removed your application from the App Store.

Status Update notification email

You can opt-in to receive email notifications alerting you to a change in the status of your applications. Visit the Manage Users section of iTunes Connect, click Edit Profile, select the Notifications tab and click the Status Update box(es).

App Status History

You can view a log with the status history of your app within iTunes Connect.  Once a change has been made to your app, a link titled "Status History" will appear with your app details in the Manage Your Applications section. Click the link to view a history of the status changes your app has gone through. You will also be able to see which user on your iTunes Connect account made the change, if the change was initiated by Apple, and the date and time the change was made.
Determine the availability date of your app

Determine the availability date of your app

You can set the date your application will be available for purchase on the App Store when you submit your binary. If your application has not been approved by Apple prior to this date, your application will go live as soon as it has been approved. This is a global date, and applies to all territories selected. If you change this date, it will apply to all versions of your application, not just the version where you are making the change. In addition, if you set this date in the future for the release of an update that is in review, you will remove any existing versions of this app from the App Store.

Monday, September 19, 2011

List of All countries into UIPicker View +iphone

- (void)ViewDidLoad{

cityPicker = [[[UIPickerView alloc] initWithFrame:CGRectMake(0, self.view.bounds.size.height+44, 320, 216)] autorelease];
    cityPicker.tag = 10;
    cityPicker.showsSelectionIndicator = YES;
    cityPicker.delegate = self;
    cityPicker.dataSource = self;
   
    pickerToolBar = [[[UIToolbar alloc] initWithFrame:CGRectMake(0, self.view.bounds.size.height, 320, 44)] autorelease];
    pickerToolBar.tag = 11;
    pickerToolBar.barStyle = UIBarStyleBlackTranslucent;
   
    canclePikerBtn = [[[UIBarButtonItem alloc] initWithBarButtonSystemItem:UIBarButtonSystemItemCancel target:self action:@selector(dismisscityPicker:)] autorelease];
    spacer = [[[UIBarButtonItem alloc] initWithBarButtonSystemItem:UIBarButtonSystemItemFlexibleSpace target:nil action:nil] autorelease];
    doneBtn = [[[UIBarButtonItem alloc] initWithBarButtonSystemItem:UIBarButtonSystemItemDone target:self action:@selector(donecityPicker:)] autorelease];
   
    [pickerToolBar setItems:[NSArray arrayWithObjects:canclePikerBtn, spacer, doneBtn, nil]];
    [self.view addSubview:pickerToolBar];
   
       
    [self.view addSubview:cityPicker];
   
countriesArray = [[NSMutableArray alloc] init];
    NSMutableDictionary *countriesDict = [[NSMutableDictionary alloc] init];
    NSLocale *locale = [[[NSLocale alloc] initWithLocaleIdentifier: @"en_US"] autorelease];
   
    NSArray *countryArray = [NSLocale ISOCountryCodes];
    for (NSString *countryCode in countryArray)
    {
        NSAutoreleasePool * pool = [[NSAutoreleasePool alloc] init];
       
        NSString *displayNameString = [locale displayNameForKey:NSLocaleCountryCode value:countryCode];
        [countriesArray addObject:displayNameString];
        [countriesDict setObject:countryCode forKey: displayNameString];
        [pool release];
       
    }
    NSLog(@"countriesDict..%@",countriesDict);
    NSLog(@"countriesArray..%@",countriesArray);
   
    [countriesArray sortUsingSelector:@selector(compare:)];
    }


 }

// now calling button methods


- (IBAction)countrysupportBtnclicked :(id)sender{
    scroll.frame = CGRectMake(0, 0, 320, scroll.frame.size.height - (cityPicker.frame.size.height + 70) );
    [scroll scrollRectToVisible:countrysupportBtn.frame animated:YES];
    CGRect cityPickerTargetFrame = CGRectMake(0, self.view.bounds.size.height-216, 320, 216);
    CGRect toolbarTargetFrame = CGRectMake(0, self.view.bounds.size.height-216-44, 320, 44);
    [UIView beginAnimations:@"MoveIn" context:nil];
    [self.view viewWithTag:10].frame = cityPickerTargetFrame;
    [self.view viewWithTag:11].frame = toolbarTargetFrame;
    [UIView setAnimationDelegate:self];
    [UIView commitAnimations];

}
-(IBAction)dismisscityPicker:(id)sender{
    scroll.frame = CGRectMake(0, 0, 320, 480);
    CGRect toolbarTargetFrame = CGRectMake(0, self.view.bounds.size.height, 320, 44);
    CGRect cityPickerTargetFrame = CGRectMake(0, self.view.bounds.size.height+44, 320, 216);
    [UIView beginAnimations:@"MoveOut" context:nil];
    [self.view viewWithTag:9].alpha = 0;
    [self.view viewWithTag:10].frame = cityPickerTargetFrame;
    [self.view viewWithTag:11].frame = toolbarTargetFrame;
    [UIView setAnimationDelegate:self];
    [UIView commitAnimations];
}
-(IBAction)donecityPicker:(id)sender{
   
   
    scroll.frame = CGRectMake(0, 0, 320, 480);
   
    CGRect toolbarTargetFrame = CGRectMake(0, self.view.bounds.size.height, 320, 44);
    CGRect cityPickerTargetFrame = CGRectMake(0, self.view.bounds.size.height+44, 320, 216);
    [UIView beginAnimations:@"MoveOut" context:nil];
    [self.view viewWithTag:9].alpha = 0;
    [self.view viewWithTag:10].frame = cityPickerTargetFrame;
    [self.view viewWithTag:11].frame = toolbarTargetFrame;
    [UIView setAnimationDelegate:self];
    [UIView commitAnimations];
   
   
}


#pragma mark -
#pragma mark UIPickerView delegate

- (NSInteger)numberOfComponentsInPickerView:(UIPickerView *)pickerView{
    return 1;
}
- (NSInteger)pickerView:(UIPickerView *)pickerView numberOfRowsInComponent:(NSInteger)component{
    return  self.countriesArray.count;
}

- (NSString *)pickerView:(UIPickerView *)pickerView titleForRow:(NSInteger)row forComponent:(NSInteger)component{
    NSLog(@"countriesArray..%@",countriesArray);
    return [self.countriesArray objectAtIndex:row];
}

- (void)pickerView:(UIPickerView *)pickerView didSelectRow:(NSInteger)row inComponent:(NSInteger)component{
    countryNameLbl.text = [self.countriesArray objectAtIndex:row];
    [registerInfoDic setObject:countryNameLbl.text forKey:COUNTRY_SUPPORT];
}
//pickerview

eMail validation on iphone

- (BOOL) validateEmail:(NSString*)email
{
    if( (0 != [email rangeOfString:@"@"].length) &&  (0 != [email rangeOfString:@"."].length) )
    {
        NSMutableCharacterSet *invalidCharSet = [[[[NSCharacterSet alphanumericCharacterSet] invertedSet]mutableCopy]autorelease];
        [invalidCharSet removeCharactersInString:@"_-"];
       
        NSRange range1 = [email rangeOfString:@"@" options:NSCaseInsensitiveSearch];
       
        // If username part contains any character other than "."  "_" "-"
       
        NSString *usernamePart = [email substringToIndex:range1.location];
        NSArray *stringsArray1 = [usernamePart componentsSeparatedByString:@"."];
        for (NSString *string in stringsArray1) {
            NSRange rangeOfInavlidChars=[string rangeOfCharacterFromSet: invalidCharSet];
            if(rangeOfInavlidChars.length !=0 || [string isEqualToString:@""])
                return NO;
        }
       
        NSString *domainPart = [email substringFromIndex:range1.location+1];
        NSArray *stringsArray2 = [domainPart componentsSeparatedByString:@"."];
       
        for (NSString *string in stringsArray2) {
            NSRange rangeOfInavlidChars=[string rangeOfCharacterFromSet:invalidCharSet];
            if(rangeOfInavlidChars.length !=0 || [string isEqualToString:@""])
                return NO;
        }
       
        return YES;
    }
    else // no '@' or '.' present
        return NO;
}

Tuesday, August 30, 2011

remove duplicate values from NSMutableArray in Objective-C

NSArray *copy = [YourMutableArray copy];
 
NSInteger index = [copy count] - 1;
 
for (id object in [copy reverseObjectEnumerator]) {
 
    if ([YourMutableArray
         indexOfObject:object inRange:NSMakeRange(0, index)] 
         != NSNotFound) 
 {
        [YourMutableArray removeObjectAtIndex:index];
 
    }
 
    index--;
}
[copy release];

Monday, August 29, 2011

stretch image in UIWebView

NSString *imageName = [[NSBundle mainBundle]
                        pathForResource:@"YourImageName" 
                        ofType:@"png"];
 
NSURL *imageURL = [NSURL fileURLWithPath: imageName];
 
NSURLRequest *imageRequest =[NSURLRequest requestWithURL:imageURL];
 
	// Load image in UIWebView 
 
imageWebView.scalesPageToFit = YES;
 
 
[imageWebView loadRequest: imageRequest];

Submitting iPhone Apps To The Apple App Store

Here’s a quick step by step guideline that you can print and keep hand, to use when your app is ready for submission. I am assuming that the reader of this article has an iPhone Developer License.

====== Step 1 ======

Certificate is an essential element to submit or test an application on iphone. It comes with code sign(Signatures) which would verified when an application is submitted on apple store or when tested on iphone.

One can bypass these if an application is installed on jail-break iphone or  when submitted on Cydia but this is not possible when one wants submit it to Appstore.


One has to through 2 step procedure to create a certificate from developer portal. I simply copied those two from “iphone developer portal”

[1] Generating Certificate Signing Request

[2] Submitting a Certificate Signing Request for Approval

Generating a Certificate Signing Request:
[3] Open the Utilities folder and launch Keychain Access from the Applications folder.

[4] Set the value of Online Certificate Status Protocol (OCSP) and Certificate Revocation List (CRL)
to “off” in the Preferences Menu.

[5] Select Keychain Access -> Certificate Assistant -> Request a Certificate from a Certificate Authority.

[6] Fill in your email address in User Email Address Field. Confirm that this email address is same as provided at the time of registering as iPhone developer.

[7] Fill in your name in the Common Name field. Confirm that this name is same as provided at the time of registering as iPhone developer.

[8] It is not necessary to have an Certificate Authority (CA). The ‘Required’ message would be eliminated after finishing the following step.

[9] Click the ‘save to disk’ radio button if prompted, choose ‘Let me specify key pair information’ and proceed.

[10] If  you choose ‘Let me specify key pair’ option then one has provide a file name and click ‘Save’. Select ‘2048 bits’ for Key Size and ‘RSA’ for the algorithm in next screen and proceed.

[11] CSR file would created on the desktop by Certificate Authority.


Submitting a Certificate Signing Request for Approval:
[1] Once CSR file is created log in to the iPhone developer program portal and go to ‘Certificates’> ‘Development’ and select ‘Add Certificate’.

[2] Click the ‘Choose file’ button, select your CSR and click ‘Submit’. The portal will reject the CSR if Key Size is not set to 2048 bit at the time of CSR creation.

[3] This will followed by notification to Team Admins by email of the certificate request.

[4] The change in the certificate status would informed by email on approval or rejection of the CSR by Team Admin.


Download/Installing Certificate on your machine
[5] Once the CSR is approved the Team Members and Team Admins can download their certificates via the ‘Certification’ section of the Program Portal.  Choose ‘Download’ next to the certificate name to download your iPhone development certificate to your local machine.

[6] Once this is done double-click the .cer file to launch Keychain Access and install your certificate.
On installation of certificate on your MAC the next step is to create an App ID.

Note: You have to follow this step only once and late you don’t have to make certificates for your other applications.


====== Step 2 ======


Follow the following steps to create an App ID:
[1] Go to ‘App IDs’ and click ‘App ID’ after logging in to iPhone developer program portal.

[2] Populate the ‘App Id Name’ field with your application name (that is – iPhone app) and in ‘App Id’

enter something like com.yourdomain.applicationname (i.e com.vijay.iphoneapp) and click submit.

[3] Please do note down the “App Id” as this would be utilized in Info.plist, bundle identifier tag.


====== Step 3 ======


Next step would be to create a Provisioning file for our Xcode and is the last step for creating binary which would submit it to Appstore.

[1] After you navigate to ‘Provisioning’> ‘Distribution’ click ‘Add Profile’ in iphone developer program portal.
 
[2] Choose “App Store” in “Distribution Method”.

[3] In “Profile Name” enter your application name (i.e iphoneapp) which will be your provisioning profile name as well.

[4] In “App ID” select the app name(i.e. iphoneapp) which you created in Step 2.

[5] After downloading the Provisioning profile copy it to your/YourUserName/Library/MobileDevice/Provisioning Profile.


====== Step 4 ======


Now everything is step up, open your project in Xcode
[1] Click “i” Info button after selecting your project from “Group & File” in left side bar.

[2] Navigate to “Configuration” tab and select “Release”. Click the “Duplicate” button from bottom, name is “iphoneDistribution”.

[3] Click on “Build” tab and choose “iphoneDistribution” and enter in “Search in Build Settings” filed ‘Base SDK’ and select the current selected Device and  change to what gadget your application is targeting (I prefer “Device-iPhone OS 2.0)

[4] Now in “Search in build setting” field enter “code signing identity” and choose the provisioning profile created earlier in Step 3. Apply the same to the child property “Any iPhone OS Device”.

[5] Once this done close the Info screen and select the “Target”> “Your App” from “Group & File” in left side bar and click on “Info” button again from Xcode.

[6] To be on the safer side repeat step 3 and 4.

[7] With the Info screen still open click on “Properties” tab and enter “App Id”(i.e. com.vijay.iphoneapp) in Identifier field.

[8] Now that all is done, click on “Build” (cmd+B) from Xcode>Build.

[9] You will find your binary file created on right clicking on “Product”> “YourApp” and selecting “Reveal in Finder”. Zip this file.

====== Step 5 ======


The next step is to submit the binary file created to itunesconnect.
[1] In your browser type https://itunesconnect.apple.com/ (this website is very slow over https) and login using your iPhone developer account.

[2] Click on “Manage Your Account” > “Add Application”

[3] On replying to a simple question from apple you can sumbit your application to app store. You also need few things in your system before you submit your application.

a) Application Name (must be unique)

b) Application description

c) Application Category

d) URL for your application feedback.

e) Icon of your application in 512 x 512 size.

f) Main picture of your application in 320 x 480 or 320 x 460 size. (You have option to submit up to 4  more pictures of your application).

Wednesday, August 17, 2011

Creating an image thumbnail

-(void)imagePickerController:(UIImagePickerController *)picker didFinishPickingImage:(UIImage *)image editingInfo:(NSDictionary *)editingInfo{
 
// set the image we have chosen to the background of the current view. (OPTIONAL!)
imageView.image  = image;
 
// write the file to the TEMP Directory in the iphone, then when the user has completed
 
 
// selecting their image from the picker, we want to write both the full sized file, and the
 
// thumbnail to the /tmp directory for use later (whatever you want)
 
NSData *pngImage = UIImagePNGRepresentation(image);
 
if([pngImage writeToFile:[NSString stringWithFormat:@"%@/tempImage.png"
TEMP_FOLDER] atomically:YES]){
 
// now that we have saved our image, lets generate a thumbnail from that image, and
// save that one as well.
 
// lets essentially make a copy of the selected image.
 
 
UIImage *myThumbNail    = [[UIImage alloc] initWithData:pngImage];
 
// begin an image context that will essentially "hold" our new image
 
 
UIGraphicsBeginImageContext(CGSizeMake(60.0,60.0));
 
// now redraw our image in a smaller rectangle.
 
 
[myThumbNail drawInRect:CGRectMake(0.0, 0.0, 60.0, 60.0)];

 
// make a "copy" of the image from the current context
 
UIImage *newImage    = UIGraphicsGetImageFromCurrentImageContext();
 
UIGraphicsEndImageContext();
 
// create a new view to place on our screen (OPTIONAL-- testing)
 
UIImageView *thumbView    = [[UIImageView alloc] initWithFrame:CGRectMake(0.0, 0.0, 60.0, 60.0)];
 
thumbView.image    = newImage;
 
[self.view addSubview:thumbView];
 
// now grab the PNG representation of our image
 
NSData    *thumbData    = UIImagePNGRepresentation(newImage);
 
// now finally we can write our new thumbnail to the tmp directory on the phone.
 
 
if([thumbData writeToFile:[NSString stringWithFormat:@"%@/tempImageThumb.png", TEMP_FOLDER] atomically:YES]){
NSLog(@"thumb written!");
}
 
// close the modal view
 
[picker dismissModalViewControllerAnimated:YES];
 
}else{
 
// there was an error writing the image file to the tmp folder....
 
 
NSLog(@" there was an error writing the file to the temp directory");
   }
}

Apple Push Notification Service (steps required to build an iPhone application that utilizes Apple's Push Notification service.)

In this article, you will learn how to perform the various steps needed to create an iPhone application that uses the APNs.

Generating a Certificate Request

The first step to using the APNs is to generate a certificate request file so that you can use it to request for a development SSL certificate later on.
1. Launch the Keychain Access application in your Mac OS X.
2. Select Keychain Access'Certificate Assistant'Request a Certificate From a Certificate Authority (see Figure 1):
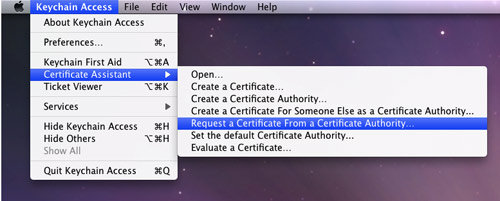
Figure 1. Generating a certificate request
3. Enter the information required and check the Saved to disk option. Click Continue (see Figure 2).
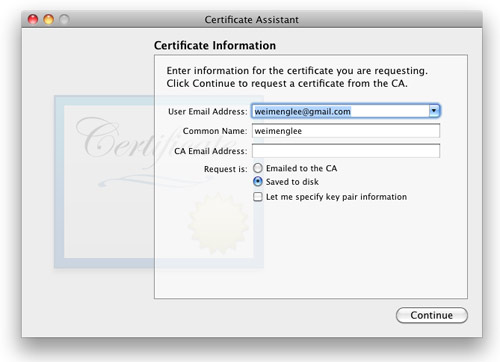
Figure 2. Saving the certificate request to disk
4. Save the certificate request using the suggested name and click Save (see Figure 3): Click Done in the next screen.

Figure 3. Naming the certificate request

Creating an App ID

Each iPhone applications that uses the APNs must have a unique application ID that uniquely identifies itself. In this step, you will learn how to create an App ID for push notification.
1. Sign in to the iPhone Developer Program at: http://developer.apple.com/iphone/. Click on the iPhone Developer Program Portal on the right of the page (see Figure 4).

Figure 4. Launching the iPhone Developer Program Portal
2. You should see the welcome page (see Figure 5).
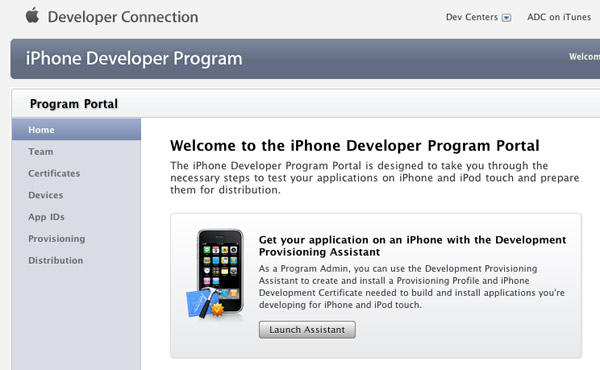
Figure 5. The welcome screen of the iPhone Developer Program Portal
3. Click on the App IDs tab on the left and then click on the New App ID button (see Figure 6).
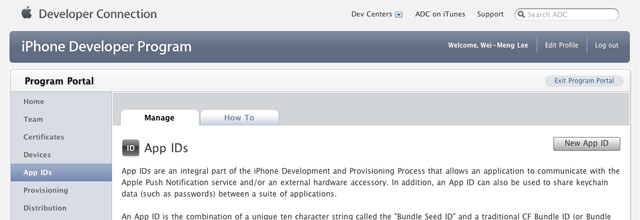
Figure 6. Clicking on the App ID tab
4. Enter "PushAppID" for the Description and select Generate New for the Bundle Seed ID. For the Bundle Identifier, enter net.learn2develop.MyPushApp. Click Submit (see Figure 7).
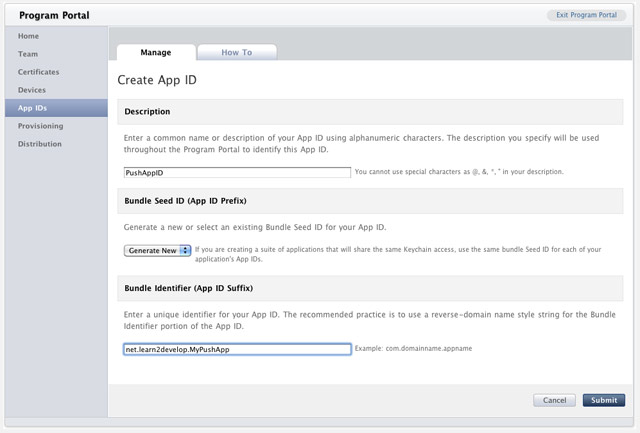
Figure 7. Creating a new App ID
5. You should now see the App ID that you have created (together with those you have previously created) (see Figure 8).

Figure 8. Viewing the newly created App ID

Configuring an App ID for Push Notifications

Once an App ID is created, you need to configure it for push notifications.
1. To configure an App ID for push notification, you need to click the Configure link displayed to the right of the App ID. You will now see the option (see Figure 9).
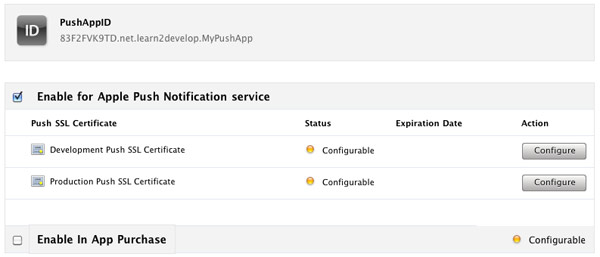
Figure 9. Configuring an App ID for push notification service
Check the Enable for Apple Push Notification service option and click the Configure button displayed to the right of the Development Push SSL Certificate.
2. You will now see the Apple Push Notification service SSL Certificate Assistant screen. Click Continue (see Figure 10).
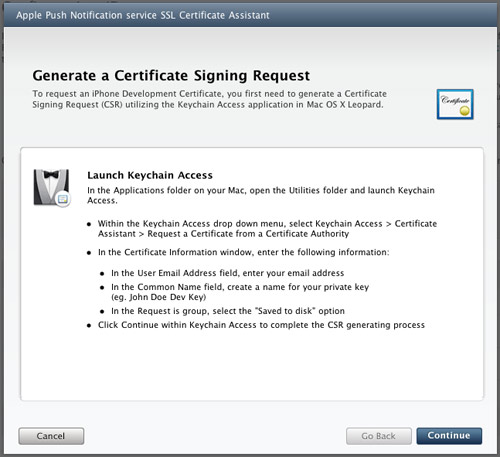
Figure 10. The Apple Push Notification service SSL Certificate Assistant screen
3. Click the Choose File button to locate the Certificate Request file that you have saved earlier. Click Generate (see Figure 11).
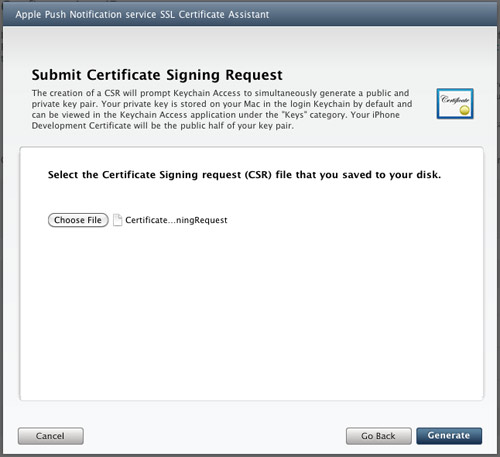
Figure 11. Generating the SSL certificate
4. Your SSL Certificate will now be generated. Click Continue (see Figure 12).
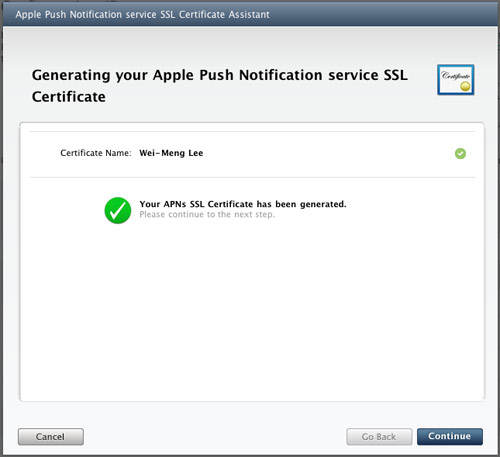
Figure 12. The APNs SSL certificate that is generated
5. Click the Download Now button to download the SSL Certificate. Click Done (see Figure 13).
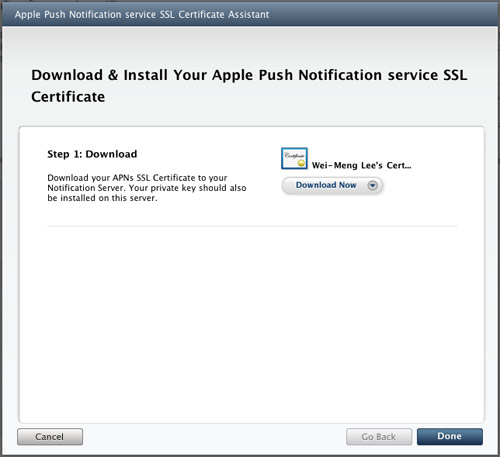
Figure 13. Downloading the certificate generated
6. The SSL Certificate that you download is named aps.developer.identity.cer. Double-click on it to install it in the Keychain Access application (see Figure 14). The SSL certificate will be used by your provider application so that it can contact the APNs to send push notifications to your applications.
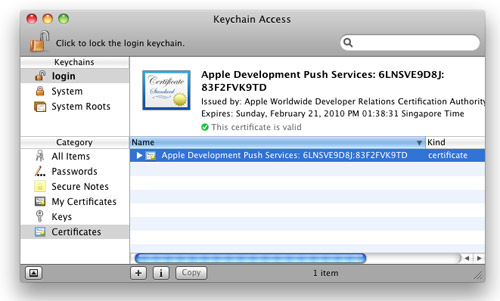
Figure 14. Installing the generated certificate into the Keychain Access application

Creating a Provisioning Profile

The next step is to create a provisioning profile so that your application can be installed onto a real device.
1. Back in the iPhone Development Program Portal, click on the Provisioning tab and click on the New Profile button (see Figure 15).

Figure 15. Selecting the Provisioning tab
2. Type in MyDevicesProfile as the profile name. Select PushAppID as the App ID. Finally, check all the devices that you want to provision (you can register these devices with the iPhone Developer Program Portal through the Devices tab). Click Submit (see Figure 16).
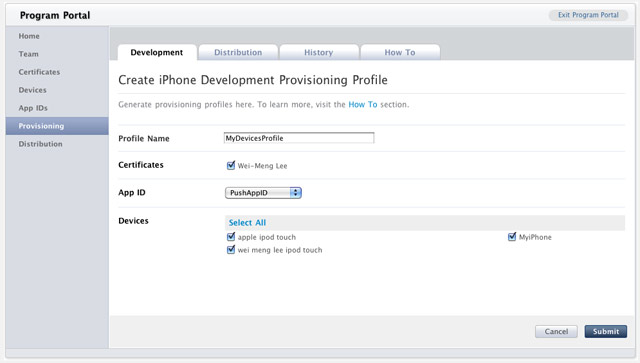
Figure 16. Creating a new provisioning profile
3. The provisioning profile will now be pending approval. After a while, you will see it appear. Click on the Download button to download the provisioning profile (see Figure 17).

Figure 17. Pending the approval of the provisioning profile
4. The downloaded provisioning profile is named MyDevicesProfile.mobileprovision.

Provisioning a Device

With the provision profile created, you will now install it onto a real device.
1. Connect your iPhone or iPod Touch to your Mac.
2. Drag and drop the downloaded MyDevicesProfile.mobileprovision file onto the Xcode icon on the Dock.
3. Launch the Organizer application from within Xcode and select the device currently connected to your Mac. You should see the MyDevicesProfile installed on the device (see Figure 18).
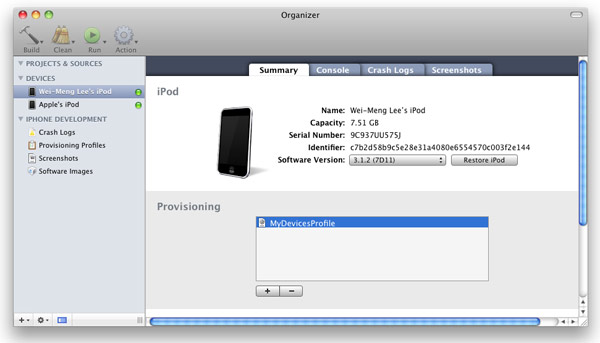
Figure 18. Viewing the installed provisioning profile

Creating the iPhone Application

1. In Xcode, create a new View-Based Application project and name it as ApplePushNotification.
2. Drag and drop a WAV file (shown as beep.wav in this example) onto the Resources folder in Xcode (see Figure 19).
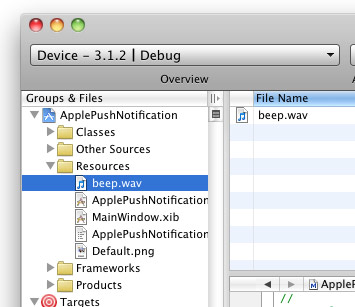
Figure 19. Adding a WAV file to the project
3. Expand on the Targets item in Xcode and select the ApplePushNotification item. Press Command-I. In the Info window, click the Properties tab (see Figure 20).
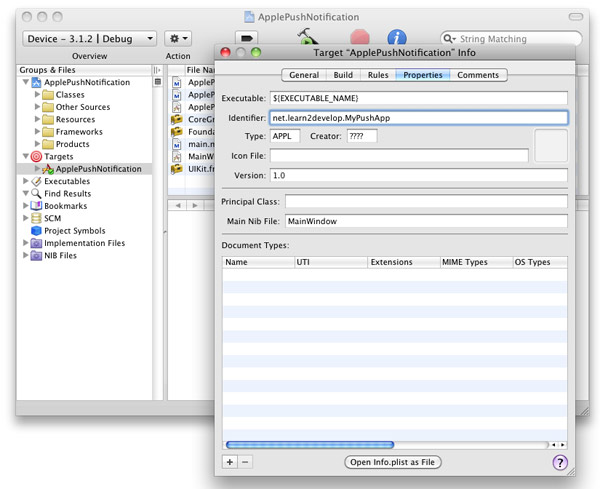
Figure 20. Entering the App ID for the application
In the Identifier textbox, type <net.learn2develop.MyPushApp.
4. Click on the Build tab and type "Code Signing" in the search box. In the Any iPhone OS Device item, select the profile as shown in Figure 21:
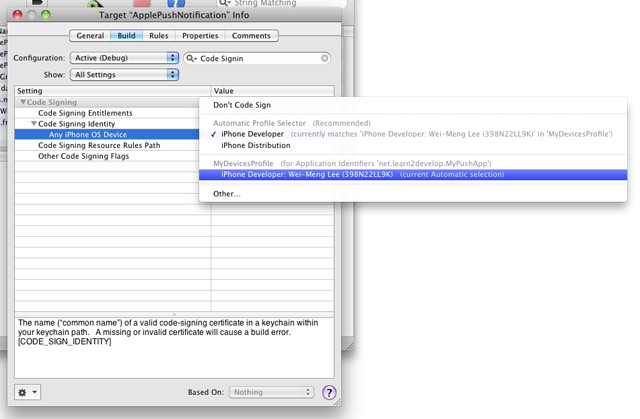
Figure 21. Selecting the profile for code signing
5. In the ApplePushNotificationAppDelegate.m file, type the following code in bold:
#import "ApplePushNotificationAppDelegate.h"
#import "ApplePushNotificationViewController.h"
 
@implementation ApplePushNotificationAppDelegate
 
@synthesize window;
@synthesize viewController;
 
- (void)applicationDidFinishLaunching:(UIApplication *)application {    
    [window addSubview:viewController.view];
    [window makeKeyAndVisible];
 
    NSLog(@"Registering for push notifications...");    
    [[UIApplication sharedApplication] 
        registerForRemoteNotificationTypes:
        (UIRemoteNotificationTypeAlert | 
         UIRemoteNotificationTypeBadge | 
         UIRemoteNotificationTypeSound)];
 
}
 
- (void)application:(UIApplication *)app didRegisterForRemoteNotificationsWithDeviceToken:(NSData *)deviceToken { 
 
    NSString *str = [NSString 
        stringWithFormat:@"Device Token=%@",deviceToken];
    NSLog(str);
 
}
 
- (void)application:(UIApplication *)app didFailToRegisterForRemoteNotificationsWithError:(NSError *)err { 
 
    NSString *str = [NSString stringWithFormat: @"Error: %@", err];
    NSLog(str);    
 
}
 
- (void)application:(UIApplication *)application didReceiveRemoteNotification:(NSDictionary *)userInfo {
 
    for (id key in userInfo) {
        NSLog(@"key: %@, value: %@", key, [userInfo objectForKey:key]);
    }    
 
}
 
- (void)dealloc {
    [viewController release];
    [window release];
    [super dealloc];
}
 
@end
6. Press Command-R to test the application on a real device. Press Shift-Command-R in Xcode to display the Debugger Console window. Observe carefully the device token that is printed (see Figure 22). In the figure below, the token is: 38c866dd bb323b39 ffa73487 5e157ee5 a85e0b7c e90d56e9 fe145bcc 6c2c594b. Record down this device token (you might want to cut and paste it into a text file).
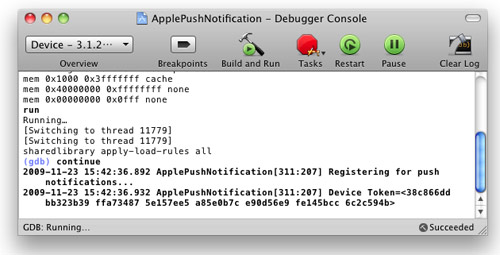
Figure 22. Viewing the device token for push notification
7. If you go to the Settings application on your iPhone/iPod Touch, you will notice that you now have the Notifications item (see Figure 23).
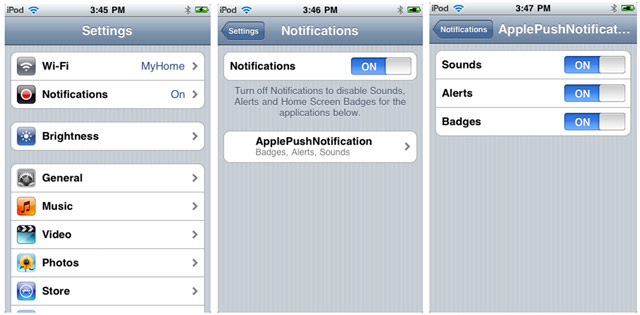
Figure 23. Viewing the Notifications item in the Settings application

Creating the Push Notification Provider

A Push Notification provider is an application written by the application's developer to send push notifications to the iPhone application through the APNs.
Here are the basic steps to send push notifications to your applications via the Apple Push Notification Service (APNs):
1. Communicate with the APNs using the SSL certificate you have created earlier.
2. Construct the payload for the message you want to send.
3. Send the push notification containing the payload to the APNs.
The APNs is a stream TCP socket that your provider can communicate using a SSL secured communication channel. You send the push notification (containing the payload) as a binary stream. Once connected to the APNs, you should maintain the connection and send as many push notifications as you want within the duration of the connection.
Tip: Refrain from opening and closing the connections to the APNs for each push notification that you want to send. Rapid opening and closing of connections to the APNs will be deemed as a Denial-of-Service (DOS) attack and may prevent your provider from sending push notifications to your applications.
The format of a push notification message looks like Figure 24 (figure from Apple's documentation):

Figure 24. Format of a push notification message
For more details, please refer to Apple Push Notification Service Programming Guide.
The payload is a JSON formatted string (maximum 256 bytes) carrying the information you want to send to your application. An example of a payload looks like this:
{
    "aps": { 
        "alert" : "You got a new message!" ,
        "badge" : 5, 
        "sound" : "beep.wav"},
     "acme1" : "bar", 
     "acme2" : 42
}
To save yourself the trouble in developing a push notification provider from scratch, you can use the PushMeBaby application (for Mac OS X) written by Stefan Hafeneger (Get it here).
1. Open the PushMeBaby application in Xcode.
2. Right-click on the Resources folder in Xcode and select Add Existing Files…. Select the aps.developer.identity.cer file that you have downloaded earlier (see Figure 25).
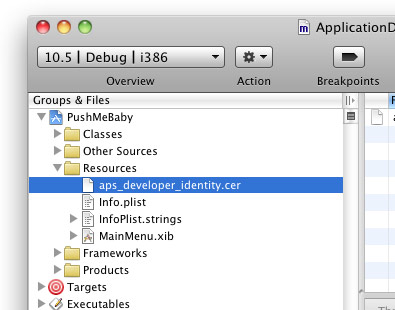
Figure 25. Adding the SSL certificate to the application
3. In the ApplicationDelegate.m file, modify the code as shown in bold below:
- (id)init {
    self = [super init];
    if(self != nil) {
        self.deviceToken = @"38c866dd bb323b39 ffa73487 5e157ee5 a85e0b7c e90d56e9 fe145bcc 6c2c594b";
 
        self.payload = @"{\"aps\":{\"alert\":\"You got a new message!\",\"badge\":5,\"sound\":\"beep.wav\"},\"acme1\":\"bar\",\"acme2\":42}";
 
        self.certificate = [[NSBundle mainBundle] 
            pathForResource:@"aps_developer_identity" ofType:@"cer"];
    }
    return self;
}
4. Press Command-R to test the application. You will be asked to grant access to the certificate. Click Always Allow (see Figure 26):
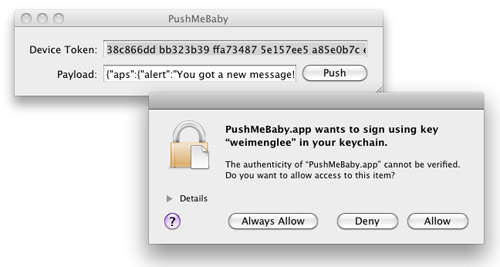
Figure 26. Granting access to the SSL certificate
On the iPhone/iPod Touch, ensure that the ApplePushNotification application is not running. To send a message to the device, click the Push button. The server essentially sends the following message to the Apple Push Notification server:
{
    "aps": { 
        "alert" : "You got a new message!" ,
        "badge" : 5, 
        "sound" : "beep.wav"},
     "acme1" : "bar", 
     "acme2" : 42
}
5. If the message is pushed correctly, you should see the notification as shown in Figure 27.
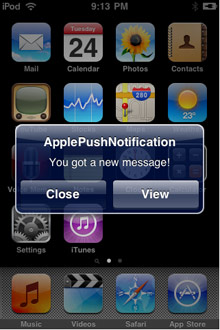
Figure 27. Receiving a Push Notification message
6. If you now debug the ApplePushNotification application by pressing Command-R and send a push message from the PushMeBaby application, the Debugger Console window will display the following outputs:
2009-11-24 21:11:49.182 ApplePushNotification[1461:207] key: acme1, value: bar
2009-11-24 21:11:49.187 ApplePushNotification[1461:207] key: aps, value: {
    alert = "You got a new message!";
    badge = 5;
    sound = "beep.wav";
}
2009-11-24 21:11:49.191 ApplePushNotification[1461:207] key: acme2, value: 42

Summary

In this article, you have seen the various steps required to build an iPhone application that utilizes Apple's Push Notification service.

Tuesday, August 16, 2011

Slide to Unlock .... Feel :-)


For this look and feel you need in .h file :-
Nothing.png 

slideButton.png 

Container.png 

#import <UIKit/UIKit.h>

@interface SlideToUnlockViewController : UIViewController {
   
    IBOutlet UISlider *slideToUnlock;
    IBOutlet UIButton *lockButton;
    IBOutlet UILabel *myLabel;
    IBOutlet UIImageView *Container;

}

@property (nonatomic, retain) UISlider *slideToUnlock;
@property (nonatomic, retain) UIButton *lockButton;
@property (nonatomic, retain) UILabel *myLabel;
@property (nonatomic, retain) UIImageView *Container;

-(IBAction)UnLockIt;
-(IBAction)LockIt;
-(IBAction)fadeLabel;

@end


and in .m file :- 

@synthesize slideToUnlock, myLabel, lockButton, Container;

BOOL UNLOCKED = NO;


- (void)viewDidLoad {

    [super viewDidLoad];

    // initialize custom UISlider (you have to do this in viewdidload or applicationdidfinishlaunching.
  
UIImage *stetchLeftTrack= [[UIImage imageNamed:@"Nothing.png"]
                      stretchableImageWithLeftCapWidth:30.0 topCapHeight:0.0];
  
UIImage *stetchRightTrack= [[UIImage imageNamed:@"Nothing.png"]
                       stretchableImageWithLeftCapWidth:30.0 topCapHeight:0.0];
   
[slideToUnlock setThumbImage: [UIImage imageNamed:@"SlideToStop.png"] forState:UIControlStateNormal];
 
  [slideToUnlock setMinimumTrackImage:stetchLeftTrack forState:UIControlStateNormal];
 
  [slideToUnlock setMaximumTrackImage:stetchRightTrack forState:UIControlStateNormal];
   
}


-(IBAction)LockIt {
   
    slideToUnlock.hidden = NO;
  
    lockButton.hidden = YES;
  
    Container.hidden = NO;
  
    myLabel.hidden = NO;
   
   myLabel.alpha = 1.0;
   
   UNLOCKED = NO;
   
   slideToUnlock.value = 0.0;
  
    NSString *str = @"The iPhone is Locked!";
  
   UIAlertView *alert = [[UIAlertView alloc] initWithTitle:@"Locked" message:str delegate:self cancelButtonTitle:nil otherButtonTitles:@"OK", nil];
 
    [alert show];
  
   [alert release];
}

       -(IBAction)fadeLabel {

    myLabel.alpha = 1.0 - slideToUnlock.value;
   
   }

       -(IBAction)UnLockIt {

   
         if (!UNLOCKED) {


        if (slideToUnlock.value ==1.0) {  // if user slide far enough, stop the operation   
          
  // Put here what happens when it is unlocked
           
            slideToUnlock.hidden = YES;
          
           lockButton.hidden = NO;
         
          Container.hidden = YES;
       
            myLabel.hidden = YES;
          
         UNLOCKED = YES;
      
      }
      else
            {
            // user did not slide far enough, so return back to 0 position
         
             [UIView beginAnimations: @"SlideCanceled" context: nil];
          
             [UIView setAnimationDelegate: self];
       
            [UIView setAnimationDuration: 0.35];
           
              // use CurveEaseOut to create "spring" effect
         
            [UIView setAnimationCurve: UIViewAnimationCurveEaseOut];   
       
            slideToUnlock.value = 0.0;
           
            [UIView commitAnimations];
           
           
            }
       
      }
   
  }